Burns Supper 2007 left me not only with lots of leftover leeks that I had bought for the cock a leekie soup and ended up using in a savoury leek souffle. I also had some neeps & tatties left over (that's boiled and mashed turnips and potatoes for those of you who don't speak Scots; neeps and tatties are the traditional accompaniments for haggis:) The best way to use up those vegetable mashes, obviously, is to make karelian pasties or karelian pies. Yep, you've seen these Finnish goodies on this blog before - here, served with eggy butter. Karelian pasties are small rye-crusted pastries (usually)with rice porridge or potato mash filling, although carrot, carrot & potato, turnip & potato, carrot & rice, barley porridge, etc fillings are available, too. I usually simply buy them from a local supermarket, but they aren't so difficult to make. The crust is simple and inexpensive flour and water affair, the filling is simple and inexpensive, too. Yet, the resulting pasties are nothing less than delicious, especially with eggy butter or simply buttered and eaten with a slice of savoury ham, for instance.
Karelian pasties
(Karjala pirukad)
Dough:
200 ml cold water
1 tsp salt
250 ml rye flour
250 ml wheat flour
Potato and turnip filling:
500 grams potatoes
500 grams turnips
100 ml milk
1 tsp salt
1 tsp sugar
15 grams butter
1 Tbsp wheat flour
For the dough, mix water, salt and flour by hand. Knead into a dough (you may need a bit more flour, the dough should be dry-ish and pliable), divide into dozen pieces. Press each dough piece into a ball, then flatten and roll into thin discs on a desktop dusted with rye flour. Keep the dough balls and rolled discs under a large piece of cling film to keep them moist.
Place a heaped tablespoon or two of your chosen filling (I've given a recipe for turnip & potato one here), and crinkle (?) the edges over the filling (see photo). You should be able to see the filling, as it's an open pastry!
Bake at 300°C for 15-20 minutes, until the pasties are slightly golden brown at edges.
Meanwhile, heat some milk and butter in a small saucepan, keep warm!
When the pasties are done, take them out of the oven, dip into the hot milk-and-butter mixture, drain and place in a bowl, covered with a clean kitchen towel. This is the only way to get moist and soft Karelian pasties.
For the filling, peel turnips and potatoes and boil separately until soft. Mash, add the milk, butter and flour, season with salt and sugar.
Wednesday, February 28, 2007
Tuesday, February 27, 2007
MEME: Five things you didn't know about me
Ximena of the picturesque Lobstersquad blog has tagged me for the Five Things You Didn't Know About Me meme*. Sometimes I think I've revealed too much information about me on this blog, so I've been known to sneakily remove some personal information every now and then. On the other hand, some of my friends complain that this is 'all just about food and not enough about you'. Go figure..
In any case, here are five things I don't think you knew about me.
#1 I worked as a child model for two years from the age of 4-5 (pre-school age). There are no magazine pictures of the little model, as I did stage modelling for the Tallinn Fashion House (the only one in town during the Soviet era), as well as clothes fitting. I loved the clothes fittings, as I could sit on the turn-table and swirl myself around and around. My mum still has a pay sheet for me from 1979!! That was long before I turned into a spotty teenager with thick glasses obviously..
#2 I've got a very selective memory for phone numbers. I can tell you the number of my Danish host family in sleep (I was an exchange student there in 1992/1993). Yet I cannot tell you my boyfriend K.'s or my mum's phone number (they're safely stored in my mobile as well as diary). I know my dad's and sister's by heart, however. Cannot explain it myself..
#3 I'm what you call 'upwardly mobile'. Both my parents went to a vocational school - my dad trained as a merchant sailor and my mum as a seamstress (nowadays, my dad works as a pilot in Tallinn harbour and my mum works at the City Registry). I've got a BA in Sociology, MSc in Nationalism Studies and PhD in Sociology. My parents are very proud of me. One of my grandmothers, however, was worried that I'd stay a spinster as nobody would want such an over-educated wife. Luckily, K. doesn't seem to mind:)
#4 I've lived abroad for a long time - one year in Svendborg, Denmark from the age of 18, and seven years in Edinburgh, Scotland (ages 24-25 and again 26-32). That's one quarter of my life!! I'm very happy to be back at home in Estonia now, however..
#5 I don't drive, as I'm a wee bit afraid of it. My dad is a former rally driver (and a very good one at that) as well as a driving instructor (that was after quitting the seas after my sister was born); my sister happily goes go-karting and racing (despite surviving a very bad car accident at the age of 18). I reluctantly got my driving licence at the age of 26, and since then have only sat behind the wheel twice - on suburban roads. We're currently in the process of buying a new car for me. That means I find a car I like, K. test-drives it and asks all the necessary questions, while I sit next to him on the passenger seat. I guess I need to talk to my dad about taking some driving lessons before I actually hit the roads in a few months..
That's enough, I think - there are some details I better keep to myself:)
I'd love to read what my georgaphically close bloggers have to share, so I'm tagging Anne (done!), Dagmar, Clivia (done!), Antti, Zarah Maria and Deinin (done!) (participation is strictly optional, obviously).
* UPDATE 7.3.2007 - I rather embarrassingly only realised, that Michelle had tagged me for this meme already on New Year's Eve, but I must have overlooked this back then. Sorry, Michelle!
Monday, February 26, 2007
Waiter, there is something in my ... salmon kulebyaka
For the first round of Waiter, there is something in my ... ! I made Anthony Bourdain's boeuf bourgoingnon. For the second round of this new foodblogging event - in February focusing on pies and hosted by CookSister's Jeanne - I made something from the Russian cuisine: kulebyaka. Kulebyaka should have been on my 2007 list of foodie resolutions, as I had been thinking about making it for months, but somehow it slipped my mind when I wrote the post. But better late than never, and now was my chance to make that festive Russian pie. Kulebyaka is a high and oblong closed pie with different types of fillings. When looking for the perfect recipe, I came across kulebyakas stuffed with fish, mushrooms, meat, cabbage, even apples. Some recipes used puff pastry, some yeast pastry. I realised that it is the shape of the pie (enclosed, high, long) that distinguishes kulebyaka from a pirog (that's simply a 'pie' in Russian). However, to me kulebyaka has always meant - first and foremost - a fancy puff pastry pie filled with salmon and rice. At the end, puff pastry, sliced fresh salmon, rice, dill and dainty quail's eggs were my chosen ingredients. For those of you from the British Isles - think of Beef Wellington, just with salmon and rice instead of beef and mushrooms.
Salmon kulebyaka
(Lõhekulebjaaka)
Serves 6-8
500 grams puff pastry
500 grams salmon or trout fillet, thinly sliced
150 ml rice
12 quail's eggs
fresh dill, chopped
salt
freshly ground black pepper
lemon juice
(egg for brushing, black peppercorns for decorating)
Season the salmon slices with salt, pepper and lemon juice.
Cook the rice in salted water until al dente. Drain and cool.
Boil the quail's eggs in simmering water for 2-3 minutes, then cool quickly under cold running water. Peel and put aside.
Roll out the puff pastry.
Place the smaller pastry sheet on a baking tray. Cover with 1/2 of the rice, then dill and 1/2 of the salmon slices. Place the quail's eggs over the salmon.
Sprinkle with dill, then cover with the rest of the rice, top with salmon slices (see right) and sprinkle any leftover dill on top. Season with salt and pepper and a squeeze or two of lemon juice.
Cover with the larger pastry sheet. Decorate with small cut-out fish figures (optional - I used black peppercorns for eyes:). Make a couple of insertions into the pastry with a sharp knife, so the steam can evaporate during cooking.
Brush with egg.
Bake at 200C for 20-30 minutes, until kulebyaka is golden brown.
Serve hot, either with a good bouillon (traditional way) or a dollop of mayonnaise.
Here's a cross-section of the finished pie - I really liked the way those quail's eggs looked:
Tuesday, February 20, 2007
Perfect buns (re-posting)
Today (February 20, 2007) is vastlapäev or Shrove Tuesday again. All youthful Estonians are sledding down the hills tonight, eating copious amounts of bean or pea soup and maybe even some pig's trotters afterwards, followed by several fluffy cream-filled lenten buns. Not me, however. I'm skiing on the slopes of Italian Alps, checking out the restaurants in Valle d'Aosta and stuffing myself on Italian food. Life is good.
The post below originally appeared on March 1, 2006. I'm re-posting it to 1) mark the folk calendar occasion and 2) convince you to bake these. Believe me, these buns are perfect indeed!
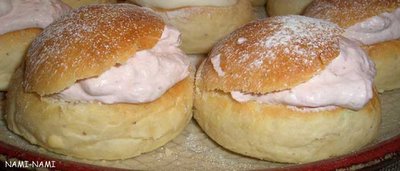
Last night was supposed to be Shrove or Pancake Tuesday, but if you had visited any Nordic foodblogs, you'd realise that it wasn't Pancake Tuesday, but Bun Tuesday. There were buns all over the place. In Finland, Pastanjauhantaa and Axis of AEvil wrote about laskiaspulla. In Sweden, Dagmar, Clivia and Kinna blogged about semlor. And every single Estonian had one vastlakukkel - or two - during yesterday. Most schools would have included them in lunch, and many offices order trayfuls of lenten buns to savour during the day.
The Swedes have known the semlor-buns since the late 1600s, back home in Estonia it's a more recent treat. The Estonian vastlakukkel, Finnish laskiaispulla, Swedish semla, and Danish fastelavnsbolle are pretty similar. Lenten buns are basically fluffy yeasted caramom-scented buns, where the dough is enriched with eggs and butter. In Estonia, they are served with whipped cream alone. The Swedes include almonds, the Finns either marzipan and/or jam. Some Swedes eat them in a bowl of milk (and then call it hetvägg). Since learning that the Swedish King Adolf Fredrik died in 1771 after eating 14 of these semlor-in-milk (after a subtantial multi-course meal), I'll keep having mine without milk..
Here is a recipe I've used to make my lenten buns for the last few years, adapted from an old Estonian cookbook.
Vastlakuklid: Estonian lenten buns
(Hõrgud vastlakuklid)
Yields about 24
Buns:
500 ml lukewarm milk
50 grams fresh yeast
800 grams plain flour (soft), sifted
3 Tbsp sugar
1 tsp salt
1 tsp ground cardamom seeds
200 grams butter, melted and cooled
2 eggs, whisked
Filling:
500 ml whipping cream (35-38%)
2-3 Tbsp sugar
200 ml lingonberry jam (optional)
Take all the ingredients to the room temperature about an hour before starting.
First make the dough. Crumble the fresh yeast into a bowl and add the lukewarm milk little by little, stirring with a wooden spoon until the yeast has dissolved. Add the sugar and about half of the flour, stir with the spoon. The dough is rather wet at this point, so no need to use your hands.
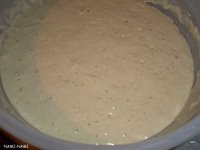
Cover the dough with a clean kitchen towel* and put in a warm place to prove. Make sure there is no draught in the kitchen! Let the dough double in size (about 30-45 minutes, depending on the kitchen conditions). It will look like the picture on the right, with small air bubbles on the surface.
When doubled in size, add the salt, cardamom, melted butter and whisked eggs. Stir in most of the flour and start kneading. You will have to knead the dough for about 10-15 minutes, until it's shiny and elastic and doesn't stick to the bowl anymore.
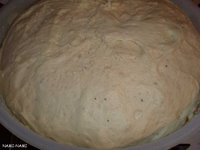
Now cover again with the kitchen towel and leave to double in size in a warm place. This should take about 45-60 minutes. Knock the dough back and leave to rise again. By this time the dough will look nice and all puffed up, quite dry in consistency.
After about half an hour you can start the rolling. Every cook probably has their own trick for making perfect buns. Here's what I do. I twist off a small piece of dough (about the size of a small to medium egg), put it onto a large piece of parchment paper, cupping my hand over the piece of dough. A bit like holding the mouse (the computer mouse, I mean), with fingers touching the working surface as well. Then I start rolling "the mouse" on the table in small, firm circles. After about 10 seconds or so, you should end up with a beautiful and perfectly shaped ball under your cupped hand. Like this:
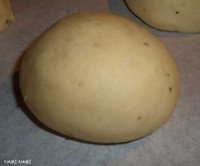
Transfer to a baking sheet. Let rise again for about 30 minutes.
Brush with milk or whisked egg (both are fine, the latter results in a shinier bun) and bake at 200-225˚C oven for about 15-20 minutes, until you have beautifully golden brown lenten buns.
[Just to recap: you pre-prove the dough, then add the rest of the ingredients and let the dough rise twice. Then you form the buns and let them rise a bit again. Then you bake:)]
Take out of the oven and cover with a kitchen towel to soften the tops. This is essential, as otherwise you'll make a mess when you start eating the cream-filled buns!
Make the filling. Whisk the cream with some sugar. I like to include some lingonberry jam in my cream filling, as this adds a nice tart touch to the otherwise very sweet bun.
Cut a small slice off the bun and fill with some cream. Put the "lid" back on.
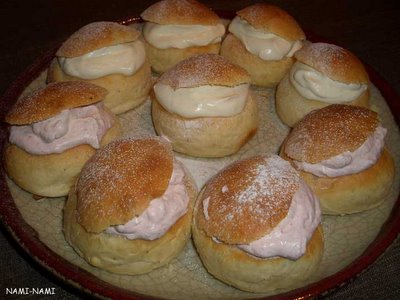
Serve. Especially delicious after a night out on a snowy hill.
* It's a good idea to cover the bowl loosely with a cling film first, so if the dough rises very high, you won't end up with a sticky kitchen towel.
Saturday, February 17, 2007
Cooking with friends: a special bottle of burgundy wine, a chantarelle cappuccino, a boeuf bourgoingnon, and a matcha loaf
Here’s how to get hold of that very special bottle of wine that you see at your friends’ place.
A fortnight ago K. and I were invited to have dinner with some good old friends of his, Peter & Kristel. We had a lovely meal, drank some good wine (and pomegranate juice) and watched holiday pictures from South Africa, where the couple had spent the New Year’s Eve. It was my first visit to their place, so I was shown around the house (lots of lovely art, a captivating fish tank). Before we continued with biltong and fig compote, we stood for a while next to the couple’s wine collection.
It was then that K. spotted a precious bottle of Burgundy: Clos de la Roche, Patriarche Père et Fils (Beaune, 1992). K. adores Burgundy, so he came up with a cunning idea.
So it happened that last Sunday, Peter & Kristel turned up at our doorstep with that very bottle of Bourgogne, as K. had managed to convince them that it’s indeed a good idea to drink this wine together. As a good bottle of Burgundy needs a good Burgundy dish, then I made my Boeuf Bourguignon again. We invited another couple, Paavo & Kristina and their little daughter Gretel over, too (yep, the ones who almost ate all my apple cake few months ago:), who contributed a starter. And not just a starter, but a stunning wild chantarelle cappuccino.
Cooking the chantarelles with herbs and cream:
The soup is ready – it does look like a real thing, doesn’t it? We used our new (well, we bought them in November) iittala Origo bowls and Arabia plates:
The incredibly smooth chantarelle cappuccino was garnished with thyme and served with stuffed baked portabello mushrooms - being made on the photo below. As you can see, then little Gretel (aged 5) is a good hand in the kitchen, although only half of the blue cheese ended up on the mushrooms, as Gretel ate the rest of it. Note that we all need some moral support in the kitchen – hence the wine glass on the worktop (for the mother) and the teddy bear (for Gretel):
For the main course, I made Anthony Bourdain’s boeuf bourgoingnon again.
And for the dessert, we had my matcha loaf (third time in less than ten days), this time made by K. and supplemented with some finely chopped almonds. K. also candied some fresh kumquats and piped some Madagascar vanilla flavoured whipped cream on top:
And as for the wine? Well, it was definitely good enough excuse for a lovely night in with old (for K.) and new (for me) friends. It was full of character for sure, even if the other bottle, Bourgogne A. Rodet (Antonin Rodet, 1998) was more to my liking..
Friday, February 16, 2007
A simple, yet festive, salmon sandwich cake
When I first wrote about a sandwich cake on this blog, it was an elaborate multi-layered affair with fancy toppings. This one is so much simpler, but no less prettier or festive. I made it few weeks ago for K's mother's birthday (yep, the same party where K. contributed a lovely cinnamon boston). I can still think of ways of developing this recipe, but it is also good enough as it is, so I'm sharing it with you now and here. It's loosely adapted from this Finnish recipe from Pirkka - the base is directly from them, whereas the topping is all mine:)
A great addition to a buffet table or coffee table - it can be eaten with a small dessert fork.
A simple salmon sandwich cake
(Lõhetort)
Serves 16
Rye bread base:
400 grams full-grain rye bread
75 grams melted butter
Filling:
350 grams cottage cheese/farmers cheese (with 4% fat)
200 grams sour cream/smetana (with 30% fat)
50 ml fresh dill, chopped
1-2 tsp wasabi paste
2 tsp sugar
1 tsp Maldon sea salt flakes
freshly ground black pepper
2 Tbsp lemon juice
5 sheets of gelatine
200 grams cold smoked salmon or trout in thin slices
To garnish:
fresh dill sprigs
thin lemon slices
slightly crushed pink peppercorns
Crumble the bread into a bowl, add the melted butter and stir until combined. Press the bread mixture into a 24x24 cake tin that has been lined with baking paper. Put into the fridge to set a little.
Soak gelatine sheets in cold water for 5 minutes.
In another bowl, mix cottage cheese, sour cream, dill and cucumber cubes. Season with salt, sugar, mustard and/or wasabi paste, and pepper.
Heat the lemon juice, add the pressed gelatine leaves and let them melt in the hot juice. Pour into the cheese mixture and combine thoroughly.
Spoon the cheese mixture onto the rye bread base and put into the fridge to set for at least four hours.
Cut the smoked salmon or trout slices into 16 long strips, each about 2-2.5 cm wide. Roll them up, twisting edges slightly outside, so you've got 'roses'.
Cut the sandwich cake into 16 squares and top each with a rose. Garnish with thin lemon slices and dill sprigs, sprinkle with slightly crushed pink peppercorns.
Thursday, February 15, 2007
Restaurant Review: Gourmet Restaurant Stenhus, Tallinn
The people behind the Estonian Gastronomy Award, SilverSpoon, have named Stenhus the Best Gourmet Restaurant in Estonia for three years in a row now (2004, 2005, 2006). And I can see why. It's a charming venue with wonderful atmosphere and gorgeous food. I was definitely sold the moment I stepped down those medieval stairs, and when I saw that they had have a Menu Estonie, I knew it was my kind of place. A bit pricey, granted, but well worth the money.
K. took me there last July, when I was still an expat-Estonian, so a special 'Estonian menu' at an upmarket restaurant was instantly appealing. I love Estonian food - especially our way with mushrooms, our humble grain porridges and fluffy mousses, hearty soups, and the simple desserts consisting of wild berries. But in the fancy world of haute cuisine and über-creative foodblogging, Estonian food tends to remain the poor old country relative.. Not in Stenhus, though. The Chef Tõnis Siigur (still in his early 30s) is obviously very talented and rather creative. He's taken some of our humblest ingredients and simplest dishes and re-invented them. I loved every single morsel I was served, and left the restaurant a bit giddy and full of ideas of re-inventing some 'culinary oldies' myself.
I apologise for the lack of pictures. It was my first meal with K. since our trip to Paris, so I just wanted to enjoy the meal and the company. By the end of the meal I felt brave enough to take one sneak shot, however (see above). I blame a certain bottle of Châteauneuf-du-Pape for that moment of courage...
Menu Estonie
705.00 EEK / 45.05 €
Beignets of Baltic Herring with Yoghurt and Morena Roe Sauce, Fresh Cucumber Salad with Coriander
I really enjoyed this one, though I had only realised few days earlier at a wedding in Stockholm that I actually quite like (some) fish roe after all. The fish was moist and flavoursome, the coriander & cucumber salad refreshing.Spiced Potato with Lingonberries and Croutons, Parsley Salad
A truly delicious course, based on the local peasant classic, mulgipuder. It's such a simple dish consisting of mashed potatoes and cooked pearl barley, topped with some fried lardons. Yet, the Chef had done wonders to it. There was a small mashed potato/barley disc on the plate, topped with tiniest of bacon morsels, and surrounded by small puddles of lingonberry coulis. Surprisingly elegant and light.Estonian Pork Confit with Turnips and Sweet Onions
This was the richest of the offerings, which is not surprising for the main course. I didn't finish all the pork, but the confit was gutsy and flavoursome. The caramelised turnip was an interesting addition, and there was not a potato on sight (a rarity in Estonia, believe me).Green Apple Jelly with Black Bread Cream and Oatflake Cookie
Yet another revelation. Rye bread soup (leivasupp) is a very old Estonian dessert, which I quite happen to love, when well-made. Tõnis Siigur had turned it into an ice cream, which was brave and definitely a successful move. Very nicely balanced by the tart apple jelly and caramelised oatflake cookie.The Menu Estonie has four courses, but I had a lovely extra dessert that night. As K. had ordered the 5-course Menu Degustation/Assorted Specialities of the Chef (950.00 EEK / 60.70 €), then the restaurant brought me an extra dessert, too.
Tomato and Strawberry Gazpacho with Basil Ice Cream
(above) was a perfect choice for a hot and long July evening. It was exactly what it promised - a sweet red gazpacho and herby sorbet (you can see a wonderful rendition of the latter over at Bea's blog). Come next summer and I'll be turning my mum's first strawberries into a dessert gazpacho for sure.I cannot wait to go back. The roaring fireplaces must be even more enchanting during long and dark winter nights...
Restoran Stenhus
Pühavaimu 13/15
Tallinn
Telephone: +372-6997780
Chef: Tõnis Siigur
Wednesday, February 14, 2007
Coconut brownies for your Valentine
Valentine's Day hasn't really caught off in Estonia, unless you count the piles of red boxes of chocolate in supermarkets. I'm with Molly here - I prefer romance in small quantities, on a daily basis, if possible :) However, I'm also a chocoholic, so any excuse for eating chocolate is good for me. The imminent arrival of Valentine's day was a good excuse to bake a chocolate cake last weekend. I chose a recipe for chocolate brownies from an Australian booklet, Sweet & Simple: Chocolate (Australian Women's Weekly). I had to bake mine in a round cake tin, as I hadn't got a square one at the time (does that mean I cannot call these 'brownies' any more??). And as I wanted my coconut brownies to be really coconutty, I doubled the amount of coconut. A good idea, if I may say so myself - the resulting brownies scored high both on chocolate and coconut scale..
We had couple of slices left - simply because we made several cakes last weekend. As for leftovers, K. crumbled some into a bowl, covered with cinnamon-scented warm cherry compote and whipped cream for a simple trifle-like pudding. Also lovely..
Coconut brownies (or a simple coconut & chocolate cake)
(Kookose-šokolaadikook)
Adapted from Sweet & Simple: Chocolate (Australian Women's Weekly)
Serves 8
80 grams butter
100 grams dark chocolate (I used 72%)
300 grams soft brown sugar
180 ml water
75 grams plain flour
25 grams unsweetened cocoa powder (about 4 Tbsp)
100 grams grated coconuts
2 medium eggs, slightly whisked
Butter a 24 cm rectangular dish, line with parchment paper.
Mix butter, chocolate, sugar and water in a medium sized saucepan and heat on a medium flame until the chocolate and butter have melted and the mixture has sort of uniform consistency.
Sift flour and cocoa powder into a large bowl, whisk in the eggs and stir in the chocolate mixture. Finally, fold in the grated coconut.
Bake at 160 Celsius for about an hour, until the cake is set.
Let it cool in the dish, then cut into small squares (or slices).
Sprinkle with icing sugar and garnish with pretty coconut slices.
Monday, February 12, 2007
Granny's cookbook: beef rolls and carrot ragout
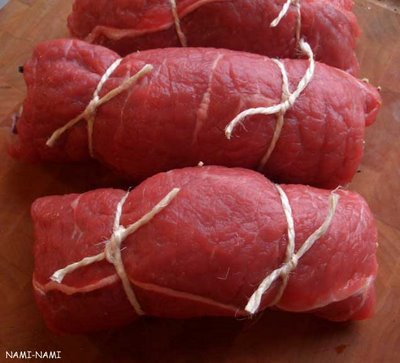
My dear K turned 35 last November, and his mum included two precious items in her present - his grandmother's handwritten cookbook from 1934, as well as his great-grandmother's handwritten cookbook (in three slim volumes!) from 1894. Precious! As I promised last month, I'll be cooking from these handwritten cookbooks a lot during the coming months, as they were full of tempting and surprising recipes. These beef rolls, for instance, included ginger in the recipe - and I thought that Estonian dishes back then only used salt and pepper...
Here are the first two recipes I tried from the 1934 booklet. They're next to each other in the booklet, so I assume they're meant to be served together. They definitely did go well together, which is not surprising, as the more modern versions of these beef rolls include carrot strips in the recipe.
Grandmother's beef rolls
(Loomaliharullid ingveriga)
Serves 4
600 grams beef (I used sirloin)
salt
black pepper
ground ginger or minced fresh ginger
1 onion
some celeriac
butter and vegetable oil for frying
boiling water
single cream (optional)
Cut the beef into 1 cm slices, across grain, and flatten'n'soften with a meat hammer.
Sprinkle some finely chopped onion, ginger and celeriac on top, roll up and tie with a undyed kitchen string (or you might end up with the infamous Bridget Jones moment!)
Fry the beef rolls in oil until browned on all sides.
Now add enough boiling water to cover the meatrolls and simmer on a medium heat until the meat has softened (this can take anything from 30 minutes to an hour, depending on your meat).
A little before the meat is cooked, add the cream.
When ready to serve, lift the meat rolls out of the gravy, remove the strings and place meatrolls on a heated serving plate.
Serve with boiled potatoes, carrot ragout and the gravy.
Serve with this slightly sweet carrot ragout, also adapted from K's grandmother's handwritten cookbook:
Carrot ragout
(Porgandiraguu)
Serves 4
500 grams organic carrots
200 ml water
1 onion
ca 50 grams butter
3-5 Tbsp concentrated tomato puree
salt
black pepper
a spoonful of brown sugar
Peel carrots and cut into thick coins (about 3-4 mm thick).
Bring the water to the boil, add carrots and boil until slightly softened, but still crisp (about 5 minutes).
Add chopped onion, simmer for a few more minutes.
Add tomato puree, season with salt, pepper and sugar. Stir in butter and simmer, until carrots are al dente, if you know what I mean:)
UPDATE 14.2.2007: Alanna mentioned this story in her BlogHer post - check it out here. Thanks, Alanna!!
Friday, February 09, 2007
Burns Supper leftovers: a savoury leek souffle
Photos updated in September 2008
I realised last week that 'thick leeks' in Scotland must be much smaller than 'thick leeks' in Estonia. Otherwise I wouldn't have ended up with so many leeks after making the cock-a-leekie soup for Burns Supper. Sue Lawrence's recipe prescribed 6 'long, thick leeks', which I dutifully bought. However, after halving and rinsing and slicing just three of these monster leeks, I realised I already had more than enough. As I didn't use all the leeks I had bought for the soup course, then I had lots of leftover leeks after the party. Suddenly I remembered a recipe for a leek souffle on the Danish Arla site, which I had bookmarked a while ago. I adapted a little, resulting in a savoury souffle made of a simple bechamel sauce and sliced leeks - easy and different.
A savoury leek soufflé
(Kohev porruvorm)
Serves 6
25-50 grams butter
75 grams plain flour
400 ml milk
4 medium eggs, separated
1 tsp salt
freshly ground black pepper
500 grams leeks
100 grams grated cheese
Halve the leeks, rinse and slice thinly.
Heat the butter in a saucepan, add the flour and stir until combined. Add milk, little by little, stirring thoroughly to avoid lumps. Bring to a simmer and cook for a few minutes until the sauce thickens.
Cool a little, stir in egg yolks, one at a time. Season with salt and pepper, add leeks and most of the grated cheese.
Whisk the egg whites until thick and fluffy, fold gently to the rest of the ingredients.
Pour into a greased 3-litre oven dish, sprinkle with some cheese and bake at 175 Celsius for about 55 minutes, watching it puff up nicely.
The leek souffle should be served straight after coming out of the oven, as it collapses slightly when cooling down. Makes a lovely side dish to some grilled meat, or as a vegetarian main course.
If you want to know what I did with the leftover neeps&tatties, then you have to come back next week:)
Thursday, February 08, 2007
Baby, it's cold outside: a creamy salmon and potato gratin
I'm sitting in my office at work with a large mug of hot tea to keep me warm. It is -17 Celsius outside (1 Fahreinheit, I believe) and I'm trying not to think that I'm supposed to step outside in half an hour to meet a friend and check out a new creperie that has opened its doors near our university. It's freezing cold. But it's also incredibly beautiful - everything is covered with a thick, pure white snow blanket, and the sun is shining amazingly brightly - if briefly. Quite appropriately for such a chilly time of the year then, the Nordic food magazines provide recipes for filling and heart-warming casserole dishes and stews. The recipe for a creamy salmon and potato gratin is adapted from the Finnish Ruokamaailma. We had it on Monday night, together with some salad leaves and cucumber slices..
Salmon and potato gratin
(Lõhevormiroog)
Serves 6
500 grams salmon fillet
0.5 tsp salt
1 onion or a small leek
oil
1,5 kg potatoes, sliced
a handful of fresh dill, chopped
To cover:
3 eggs
300 ml single cream
300 ml milk
1 tsp salt
0.25 tsp white pepper
Remove the skin and small bones from the fish, season with salt and cut into smaller slices.
Peel and slice the onion, fry gently in some oil. If using leeks, then cut in half, rinse and slice thinly.
Peel the potatoes or scrub thoroughly. Slice thinly.
Grease the oven dish with oil, cover with half of the potato slices.
Now place the fish slices, fried onions/leeks and dill on top. Cover with the rest of the potato slices.
Mix the eggs, milk and cream, season and pour over the potatoes.
Bake at 175Celsius for one hour, until potatoes are tender, and the top layer has browned and crisped nicely.
Serve with a salad.
Tuesday, February 06, 2007
Going green: a simple matcha loaf
The bright green Japanese matcha tea powder has been intriguing me for a while now. The slightly bitter taste had been haunting me since eating the Mont Fuji cake at Mariage Frères last May. The vivid green colour had captivated my visual tastebuds even earlier, when browsing Bea's and Keiko's blogs. I've now bookmarked numerous recipes using matcha. Last November I made dark chocolate & matcha truffles, but I've decided that more - many more - dishes incorporating matcha should be making an appearance in my kitchen. I'm thinking of making matcha panna cotta soon, as well as matcha ice cream. But to start things off, I made a simple green loaf during the weekend.
My green matcha loaf
(Rohelise tee keeks)
Serves 8
4 medium eggs
150 ml sugar
200 ml plain flour
1 Tbsp matcha tea powder*
a pinch of salt
150 g butter, melted and cooled
Whisk the eggs and sugar until you've got a thick, fluffy and light mixture.
Mix the flour with the matcha powder and a pinch of salt, sift into the egg mixture and fold gently until combined.
Finally fold in the cooled melted butter.
Pour into a greased 2-litre loaf tine.
Bake at 180 C for 30 minutes.
Cool and slice.
Lovely with a cup of afternoon tea.
* Note to myself: I think I'll increase 1.5-fold, maybe even double, the amount of matcha next time. The taste of matcha was really subtle this time, and I would like an even brighter colour. Also, I think adding cocoa nibs or shelled chopped pistachios would be a good idea. Raspberries for garnish possibly?
UPDATE 9.2.2007 - I made it again last night, adding about half a cup of finely chopped pistachio nuts. It tasted lovely, nuts adding a nice crumbly texture. To my great surprise, even a three-year old girl ate a whole slice, not minding the subtle bitterness of matcha at all.
UPDATE 12.2.2007 - K. made it last night, adding about half a cup of finely chopped almond slices. Again, it tasted wonderful, especially when cut in thick slices and served with home-made candied kumquats and some whipped cream.
Friday, February 02, 2007
Celebrating Burns Night with a wonderful whisky and red onion marmalade
Last Sunday the Tallinn chapter of the MacEstonians Society held a Burns Supper. Well, there is no official chapter or society as such, but as few of the previously Scotland-based Estonians (hence the Mac + Estonians) have returned home (incl yours truly) , then we thought that Burns Supper would be a perfect opportunity to catch up. There were ten of us around the table, some of whom had come from as far as Tartu and one even from Edinburgh. This was particularly handy, as we had fresh haggis to go with our neeps and tatties, the obligatory course at any Burns Supper which followed a cock-a-leekie soup and preceeded a delicious Cranachan. Obviously, Scottish music and recitals of Burns' poems were there, too.
But what do you serve between the courses and to go with the copious amounts of whisky? Well, whisky and onion marmalade, obviously. Last year I made potato shortcrust canapés filled with haggis and topped with a rich shallot and whisky gravy. This year I re-used the shallot and whisky gravy idea, but in a slightly more substantial form, making this incredibly simple recipe up as I went along. Ideally, I would have served this marmalade with some crumbly Scottish cheddar cheese and coarse oatcakes. Sadly. I couldn't find oatcakes here, neither did I have the time to bake some myself. But crispy rye bread worked well, too, as did English cheddar cheese.
Red onion marmalade with whisky
(Viski-sibulamarmelaad)
Yields about 200 ml
500 grams red onions, peeled, halved and sliced thinly
3 Tbsp olive oil
100 grams caster sugar
salt to taste
about 2 Tbsp whisky, or to taste
Peel the onions, halve lengthwise and slice thinly.
Heat oil in a heavy-bottomed saucepan. Add onions and fry at a very low heat for about 10 minutes.
Now add the sugar and salt, stir, and continue frying gently for another hour. Make sure not to burn the onions, but caramelise them slowly.
When the onions have turned into a required consistency, then add the whisky (we used a 10-year old Glenkinchie, known as The Edinburgh Malt), stir and remove from the heat. Cool.
Serve with crispbread/oatcakes and Cheddar cheese. And whisky, obviously:)
Thursday, February 01, 2007
Pidusai or a gorgeous cinnamon boston
My dear boyfriend K. has hijacked my recipe. Really. For umpteen years I used to make sweet cardamom scented and cinnamon filled rolls based on a recipe in a small treasured book I've had for ages: Cakes, Cookies and Bread from Sweden. The recipe never failed to produce satisfied smiles and happy tummies, be it at Christmas or during various birthday parties. Depending on the occasion, I either made one large round 'pidusai' (for birthdays) or individual rolls (for Christmas). To make 'pidusai', you roll the dough, fill with something yummy, roll up, cut into chunks and place the rolls into a round baking tin, where they bake into one large round bread that can be easily teared into separate rolls later. I believe it's known as 'Boston' elsewhere?
This was my cinnamon rolls/boston recipe.
Few weeks ago K. and I were discussing what to bake for his mum's birthday, and K. said he'd really love to make pidusai like his grandmother used to do. We carefully flipped through the pages of his grandmother's handwritten cookbooks from 1934, but to no avail. No such recipe.
It was then that I foolishly offered him my tried and trusted and treasured pidusai recipe.
It must have been beginners luck. After some mishaps (where did he get the idea to cut the dough into strips first and then roll them up???), K. produced a wonderful pidusai. It was a truly great success. His mum said it was as good as grandmother's. K. decided to make it again for last weekend when we went to visit my parents. Everybody was praising him. Last night I told K. that we've been invited to visit some joint friends of ours next weekend and we've been asked to bring along a cake. K. was far too quick in replying that he could make MY pidusai.
Who's supposed to be the Domestic Goddess in our household, anyway??
(I am kidding, obviously:)
Pidusai or my cinnamon boston
(Uhke pidusai)
Adapted from Bread, Cookies and Cakes from Sweden by Görel Kristina Näslund, 1985
Serves 14
50 grams fresh yeast
50 ml lukewarm water
100 grams butter, melted
300 ml milk
0.5 tsp salt
100 ml sugar
1 tsp freshly ground cardamom (about 20 pods)
600 grams plain flour (ca 1,2 litres)
Filling:
100 grams butter
100 ml sugar
0.5 Tbsp cinnamon
raisins (optional)
egg for brushing and demerara sugar for sprinkling
In a big mixing bowl, mix the yeast with the warm water until combined.
Melt the butter in a small saucepan. Add milk, then pour the lukewarm mixture (test with your little finger first that it's not too hot or it will kill the yeast!) into the yeast.
Add salt, sugar and cardamom. Add flour little by little, kneading, until you've got a uniform dough that doesn't stick to the bowl anymore. This may take up to 10 minutes kneading - don't be tempted to add more flour than prescribed, as it will result in 'heavy' pastries.
[When using KitchenAid, then add most of the flour, and knead for about 5 minutes until combined.]
Cover the mixing bowl with clingfilm or a clean towel and let it rise until doubled in size in a warm place.
Meanwhile make the filling - melt the butter, mix in sugar and cinnamon.
When the dough has risen, then knead slightly and divide into three.
Roll each into a square measuring 23x30 cm. Spread the cinnamon filling on top, (sprinkle with raisins*) and then roll up from the wide end.
Cut into thick slices (5 cm or 2 inches is ideal - see K. doing in on the right) and place into a buttered and lined springform tin.
The rolls will rise in the oven, so do not place them too tightly together.
Leave to rise for another half an hour, if possible.
Brush with egg, sprinkle with demerara sugar for a slight caramel crunch.
Bake at 200C for 20-30 minutes, until the bread has risen and turned into golden brown. Or until your kitchen smells like a cinnamon-cardamom scented heaven!
* Adding raisins was K's idea. His grandfather used to be a good cook, and insisted on putting lots of raisins into sweet breads and pastries. Apparently one only needs enough dough/pastry to keep the raisins together:) You can also add candied orange peel with raisins.