Friday, February 26, 2010

Maple-glazed drumsticks and vegetables

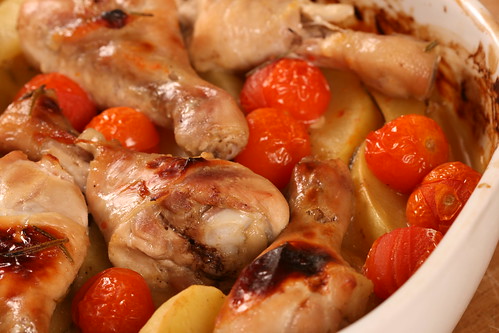
Maple roasted chicken drumsticks / Vahtrasiirupised kanakoivad

Chicken drumsticks are a really affordable cut of meat that can be made into a number of delicious dishes. I'd call it a perfect recession dish, if it weren't for the maple syrup - hardly a cheap ingredient, at least here in Estonia (and I doubt that the proper stuff is cheap anywhere). Maple syrup lends these drumsticks a lovely sweet flavour, the potatoes add the bulk and roasted cherry tomatoes cheer the whole dish up with their lovely colour.

You could obviously use chicken thighs or even breast fillets instead of drumsticks.

Maple-glazed roasted chicken drumsticks and vegetables
(Vahtrasiirupis röstitud kanakoivad)
Serves three to four

8 chicken drumsticks
4-6 large garlic cloves
6 Tbso maple syrup
2 Tbsp olive oil
1 Tbsp Dijon mustard
2 fresh rosemary sprigs, leaves only
juice of half a small lemon
500 g small potatoes
250 g cherry tomatoes
sea salt
freshly ground black pepper

Mix maple syrup, olive oil mustard, rosemary leaves and lemon juice in a medium-sized oven tray, season generously. Add the drumsticks and stir them in the mixture to cover. Add the garlic cloves (we LOVE oven-roasted whole garlic cloves over here. If that's not your favourite thing, then simply add 2-3 crushed garlic cloves to the maple glaze).
Peel the potatoes and cut into thin wedges. Add to the oven dish and give them a quick stir.
Roast in the middle of a pre-heated 200 C/400 F oven for about 20 minutes.
Scatter the cherry tomatoes on top and roast for another 15-20 minutes, until the potatoes are cooked and chicken is done.

Tuesday, February 23, 2010

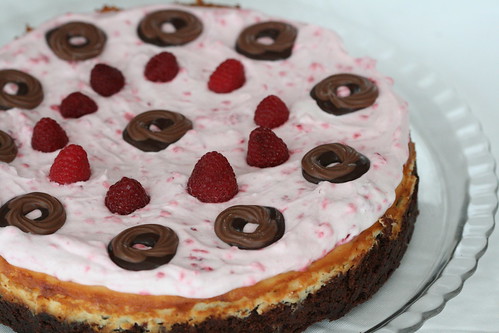
Raspberry Cheesecake Brownie a la The Hummingbird Bakery

Hummingbird's brownie-cheesecake-raspberry torta / Hummingbirdi šokolaadi-toorjuustu-vaarikatort

The Hummingbird Bakery is the bakery in London at the moment, specializing in American-style cakes and sweets. It's a brainchild of Tarek Malouf that opened in 2004, and the book - The Hummingbird Bakery Cookbook - featuring their most popular cakes and pastries was published in 2009. It's a gorgeous book, full of inviting and appetizing recipes, though the only one I've made so far is this Raspberry Cheesecake Brownie. And I've made it three times during the last month or so - for K's mum's birthday (twice) and for our daughter's first birthday party as well. I've followed the recipe more or less - replacing the icing sugar with caster sugar, topping up the amount of cheesecake to suit our local 150 g packs of cream cheese, and baking it in a round cake tin instead. I might reduce the sugar content in the brownie layer next time, as the cake is rather sweet (though the slight acidity of the raspberry layer balances it all out nicely).

The interesting thing about this cake is that the cheesecake and brownie layers are cooked at once - and this can be made a day or even two days before serving. A great cake for making in advance, as all you have to do before serving is topping it with raspberry whipped cream.

Raspberry Cheesecake Brownie
(Vaarikatega šokolaadi-toorjuustukook)

Serves 12

Hummingbird's brownie-cheesecake-raspberry torta / Hummingbirdi šokolaadi-toorjuustu-vaarikatort

Brownie layer:
200 g dark chocolate, roughly chopped
200 g unsalted butter, softened
250 g caster sugar
3 large eggs
110 g plain flour (200 ml)

Cheesecake layer:
450 g cream cheese, softened
150 g caster sugar
1 tsp vanilla extract
2 large eggs

Raspberry topping:
200 ml whipping cream
100 g caster sugar
200 g raspberries

Butter a 26 cm springform tin, line the base with a sheet of parchment paper.

For the brownie layer:
Melt the chocolate in a heatproof bowl placed over a pan of simmering water.
Cream the butter and sugar, then whisk in the eggs one at a time. Sift and fold in the flour and finally fold in the slightly cooled melted chocolate.
Pour the chocolate mixture into the cake tin.

For the cheesecake layer:
cream the softened cream cheese with sugar and vanilla extract until combined, then whisk in the eggs one at a time.
Pour the cheesecake mixture carefully over the uncooked brownie mixture.

Bake in the middle of a pre-heated 170 C / 325 F oven for 30-40 minutes, until the cheesecake is firm to the touch and light golden around the edges. (The cheesecake layer will firm furthen when cooling).

Remove the cake from the oven and let cool for at least 4 hours, preferably overnight.

Before serving whisk the cream and sugar until soft peaks form, then fold in the fresh or frozen (defrost and drain first!) raspberries. Spread the raspberry cream over the cheesecake and decorate with chocolate and extra raspberries.

Friday, February 19, 2010

Green Fruit Salad

Fruit salad / Roheline puuviljasalat

Making fruit salads during summer is easy. Take some strawberries, apples, pears, wild forest berries, juicy apricots or nectarines - basically, whatever is in season - slice, dress, garnish and serve.

During winter - at least in this part of the world - it's a lot more difficult. We're in the middle of the coldest and snowiest winter many of us can remember. None of the local fruits are in season, and the imported stuff is often of questionable quality. However, here's a recipe I've made few times that seems to suit the chilly climate of the moment. You can find reasonably good and sweet kiwi fruit, and the grapes (all imported, of course) in the shops at the moment.

I guess what I like about this simple salad is the colour. The vibrant green reminds me that the Spring is just around the corner, however unlikely it seems in Estonia at the moment...

Green Fruit Salad Recipe
(
Roheline puuviljasalat)
Serves 4 to 6

4 to 6 ripe and sweet kiwis
250 g green (seedless) grapes
half a lime, juiced and zested
a drizzle of maple syrup

Peel the kiwis and cut into thin slices. Wash the grapes, halve and remove the seeds, if necessary. Drizzle the kiwi slices and grape halves with lime juice and maple syrup, place on a serving bowl.
Scatter the lime zest on top and serve.

Tuesday, February 16, 2010

Delicious Lenten Buns with Marzipan and Raspberries (Vastlakuklid)

Lenten buns with marzipan & raspberries / Vastlakuklid vaarikate ning martsipaniga

It's Shrove Tuesday here in Estonia today, which means that people eat copious amounts of vastlakuklid aka Lenten buns aka semlor today. For the past decade I've been baking my own Lenten buns using this excellent recipe of mine. However, this year I decided to be a bit more adventurous, so I flirted with chocolate Lenten buns and marzipan-raspberry buns. Both were excellent and worth sharing with you. I start with the pink ones (after all, the pink-and-red-filled Valentine's Day has just passed).

The recipe is very slightly adapted from the Finnish Kotiliesi. Note that these can be on your table within two hours from starting. But when I mixed the dough on Sunday morning I realised that I didn't actually have the time to bake and fill the buns. So instead of quick-rising the dough in a warm place, as usual, I transferred the bowl to a very cool garage, where it had about 24 hours time to prove and rise slowly. It did wonders to the dough, I must admit - the flavour was even better than usual, so I'll be slow-proving my yeast doughs in the future as well.

Decadent Lenten Buns, filled with marzipan and raspberries
(
Vaarikased vastlakuklid)
Makes about 16

Lenten buns with marzipan & raspberries / Vastlakuklid vaarikate ning martsipaniga

Yeast dough:
300 ml milk
25 g fresh yeast or a sachet of dried instant yeast
85 g sugar (100 ml)
a pinch of salt
1 tsp ground cardamom
half of a beaten egg
450 g all-purpose/plain flour (about 800 ml)
75 g unsalted butter, softened

For brushing:
half of a beaten egg

Filling:
150 g marzipan
2-3 Tbsp milk
200-250 ml whipping or double cream
2 tsp vanilla sugar (or ordinary caster sugar and 1 tsp vanilla extract)
200 g raspberries (frozen are fine)

If using instant yeast, then mix flour, sugar, yeast, cardamom and salt in a mixing bowl. Add the lukewarm milk, whisked egg and mix until you've got a soft dough. At the end add the softened butter and knead into the dough. Cover the bowl with a clingfilm and place into a warm and draft-free place for about an hour. The dough should rise nicely and about double in size during this time.
Dust your working board with some flour and roll the dough into a long "sausage". Cut that into 15-16 chunks and form these into a nicely-shaped round balls (see my previous post for one way of doing this).
Place the dough balls onto a large baking sheet that has been covered with parchment paper. Cover the buns with a kitchen towel and let rise another 15-20 minutes.
Brush with the rest of the egg, then bake in the middle of a pre-heated 225 C oven for about 15 minutes, until the buns are lovely golden brown.
Remove from the oven and transfer to a metal rack to cool.
When cool, then cut off a top from all the buns. Using a teaspoon, scoop a small hole into the middle of each bun.
Put the scooped-out bun pieces into the food processor alongside the marzipan and some milk. Process until smooth, then spoon the marzipan filling back into the buns. Like this:

Lenten buns with marzipan & raspberries / Vastlakuklid vaarikate ning martsipaniga

Whisk the cream and sugar until thick and fluffy. Gently stir in the raspberries (use a slotted spoon to add the raspberries - you don't want the "raspberry juice" you get when defrosting the berries). Spoon or pipe the cream onto the buns, then replace the "lids".
Dust with icing sugar and serve.
Friday, February 12, 2010

Cream Cheese Spread with Beetroot and Horseradish


I should start a regular feature here on Nami-Nami, called the "Beetroot Recipe of the Month" or "This Week's Way with Beets" - as we do eat beetroot pretty much each week. It's cheap, seasonal and actually much more versatile than one might think. This recipe is inspired by a cream cheese spread served in a lovely deli-café in Tallinn, called NOP. I've used it as a sandwich filling here, but it would also work as a dip for crudités or as a topping for a jacket potato.

Cream Cheese Spread with Beet and Horseradish
(Rukkileib peedi-mädarõika kreemiga)
Serves 4

75 g cooked or roasted beetroot
150 g cream cheese, at room temperature
1 heaped tsp creamed horseradish
1 Tbsp finely chopped fresh dill
salt
freshly ground black pepper

dark rye bread, to serve

Grate the beetroot finely. Add the cream cheese, horseradish and chopped dill and mix until thoroughly combined. Season with salt and pepper.
To serve with rye bread, spread about a tablespoon of the mixture on a slice of bread, then top with another bread slice and cut diagonally into two triangles.

OTHER BEETROOT RECIPES @ NAMI-NAMI:
January 2010:
Dashing Coconut and Beetroot Soup
May 2009:
Beetroot Salad with Cottage Cheese and Leeks
November 2008:
Oven-baked Salmon with Beetroot
September 2008:
Roasted Beets with Caraway Seeds
August 2008:
Beetroot and Potato Salad
March 2008:
Marbled Beetroot Eggs
March 2008:
Bruschetta with Cheese, Garlic and Beets
February 2008:
Beetroot Hummus
January 2008:
Creamy Beetroot Soup with Horseradish
December 2007:
Russian Vinaigrette Salad
November 2007:
Beetroot Soup with Goat's Cheese
September 2007:
Delicious Vegetarian Borscht Recipe
(to be continued...)

Tuesday, February 09, 2010

Colorful Quinoa Salad with Crayfish and Avocado

Quinoa salad with crayfish tails, avocado & roasted tomatoes / & lobster tail salad / Kinoa-vähisabasalat

This is my favourite salad at the moment - I served it twice during our daughter's birthday weekend, where it was very quickly eaten by everyone. Even my dad, a typical Estonian male (read: pork and potatoes kind of guy) had two large helpings of this salad. I've been asked to make it for a friend's birthday party this coming weekend. Thinking of that, I might just bring it to my mum's birthday table in a fortnight as well - it's really delicious and light and unusual. You see, quinoa isn't widely known - or consumed - here in Estonia, and turns out it's actually really suited for our Nordic taste buds :)

Note here that the original plan was to make a cous-cous salad with shrimps and avocado, served with some creamy dressing. But the crayfish tails looked more appealing in the shop, and I had run out of cous-cous at home, so I ended up serving this delightful combination of ingredients instead.

As avocados lose their appetizing green colour with time, it's best to make this salad right before serving. This should not be a problem, as it's supereasy to make and takes almost no time whatsoever (apart from some slicing and cooking the quinoa). The quinoa can be actually still slightly warm when mixed with other ingredients.

What's your favourite way with quinoa? I've already bought another packet, you see, and would appreciate any serving suggestions!

Colourful Quinoa Salad with Crayfish and Avocado
(Kinoasalat vähisabade ja avokaadoga)
Serves ten

250 ml quinoa (a cup)
500 ml vegetable stock (2 cups)
0.5 tsp salt
2-3 Tbsp extra virgin olive oil or cold-pressed avocado oil
1 lemon, juiced
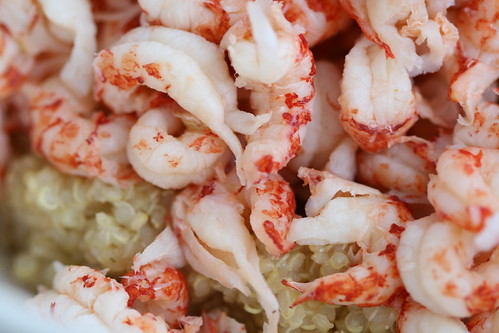
500 g crayfish tails, drained (I used hand-peeled tails in brine)
3 to 4 ripe avocados
3 to 4 roasted red peppers (from the deli counter)
a large handful of finely chopped fresh flat-leaf parsley
freshly ground black pepper

Rinse the quinoa under cold running water, using a fine mesh sieve (this is an important step, as otherwise the quinoa can be bitter). Drain.
Place the quinoa and stock (or water and Marigold bouillon powder) in a saucepan. Season with salt, then bring to the boil and simmer on medium heat for 15-20 minutes, until quinoa is soft and the water has evaporated.
Stir in the oil and half of the lemon juice. Place the quinoa into a large serving bowl.

Add the drained crayfish tails:
Quinoa salad with crayfish tails, avocado & roasted tomatoes / & lobster tail salad / Kinoa-vähisabasalat

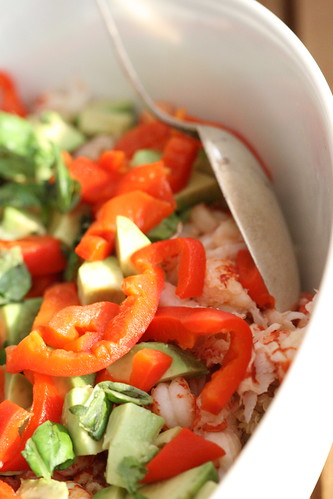
Halve the avocados, remove the seeds and scoop out the flesh. Cut the avocados into chunks or slices and sprinkle immediately with the rest of the lemon juice. Add to the serving bowl.
Slice the roasted red peppers, add to the serving bowl.

Quinoa salad with crayfish tails, avocado & roasted tomatoes / & lobster tail salad / Kinoa-vähisabasalat

Add the parsley, season with pepper and salt, if necessary. Stir gently until combined. Serve.
Fold gently so all ingredients are mixed. Sprinkle with finely chopped parsley and serve.

Sunday, February 07, 2010

Sticky & Sweet


No, I'm not talking about Madonna's 2008/2009 concert tour, but about Sticky & Sweet Chicken Wings. I've only discovered the pleasures of chicken wings (very) recently and was surprised to find that there is actually some meat and not just bones and skin involved :) I've been trying out various recipes now - three different ones just during the last week (garlickly Lebanese ones, Teriyaki wings and these sticky and sweet ones), and have bookmarked a number of other recipe ideas (Blake Royer's Baked Buffalo Wings and Susan Russo's Maple-Beer-Chili Chicken Wings, for example). I bet there will be more chicken wing recipes coming up on Nami-Nami as well.

This particular recipe is a slight adaptation of a recipe by the beloved British author, Nigel Slater. The tanginess of the mustard and sweetness of honey make these deliciously sticky and sweet indeed.

Sticky & Sweet Chicken Wings
(Kleepjad magusad kanatiivad)
Serves 3-4 as appetizers, can be easily multiplied to serve a crowd


about 600 g of chicken wings
2 heaped Tbsp grainy French mustard
1 heaped Tbsp runny honey
about 5 Tbsp lemon juice (one medium-sized lemon)
3 large garlic cloves, peeled and crushed
salt and freshly ground black pepper

First, you need to prepare you chicken wings. Using poultry shears or a sharp chef's knife, cut the wings into three parts, as shown on the photo below. Discard the wing tips. Susan mentions in her post that you can buy something called "party wings" in the States - that is chicken wings that have already had their tips removed. No such produce over here, but removing the tips is actually easy.


Combine mustard, honey, lemon juice, crushed garlic in a bowl, season with salt and pepper. Add the chicken wings and move them around, so they're evenly covered with the mixture. Cover the bowl with a cling film and leave to marinate for at least 2 hours.
Line a smallish oven dish with foil, place the chicken wings and any marinade in the tray. Roast in a pre-heated 220 C oven for about 30 minutes, turning once, until the kitchen wings are fully cooked (yet moist inside), gorgeously dark golden brown and very sticky.

Serve with a fresh salad and provide plenty of wet napkins.

Saturday, February 06, 2010

Deviled Eggs with Shrimp Filling

Devilled eggs with shrimps / Krevetitäidisega munad

Devilled eggs are a popular appetizer in Estonia - I've blogged about the classical version here. I love the traditional version, but recently I've been also exploring alternative ways of making and serving deviled eggs. Here's an idea snapped from the Swedish Arla site. It's full of Nordic flavours - dill and caraway seeds - with an addition of cooked shrimps. Slightly more festive than the traditional one, and very delicious.

Deviled Eggs with Shrimp Filling
(Krevetitäidisega munad)
Makes 12

Devilled eggs with shrimps / Krevetitäidisega munad

6 large eggs

3 heaped Tbsp sour cream
100 g peeled cooked shrimps/prawns
half a lemon, zested
0.5 tsp ground caraway seeds
2 Tbsp fresh dill, finely chopped
sea salt and freshly ground black pepper

Boil the eggs for 8-10 minutes, then cool under cold running water. Peel the eggs and halve lengthwise. Remove the egg yolks and chop finely.
Put 12 shrimps aside for garnishing. Chop the rest of the shrimps as finely or coarsely as you wish. Mix with sour cream, grated lemon zest, ground caraway seeds and chopped dill and egg yolks. Season with salt and pepper.
Spoon the filling onto the egg whites. Place on a serving tray, garnish with whole shrimps and dill sprigs.

Thursday, February 04, 2010

A Birthday Cake

Birthday cake / Sünnipäevakook

Last Saturday our beautiful little daughter, Nora Adeele, turned one. Like every other parent, we are amazed how quickly time flies - it seems hard to believe that it's already been a year since she rushed into this world last January (see a post here). I've kept stories about her at minimum here at Nami-Nami, as I've been worried it'd turn into a mommy&baby blog in no time whatsoever :D But just to recap - she's been an excellent companion to us during the last year, and a healthy, curious and happy girl. She has a good appetite (we've been trying to follow the principles of baby-led weaning), but as she's also very active, she's a light one (just 8,5 kg this morning). Oh - and she's already been to Southern France (where she dined at two 3-Michelin-star restaurants :D) and to London, so she's a well-travelled little lady.

We celebrated this important milestone with a party and a cake. The party was attended by many of Nora's friend (she's very sociable and loves playing with other kids), and a delicious cake that was inspired by the famous Swedish Princess Cake - a sponge cake sandwiched with raspberries, whipped cream and curd cheese, and topped with marzipan. As you can see from the above picture, then Nora Adeele was thrilled about her first birthday cake :)

Here's another photo of Nora Adeele (and me), taken when she's about 6 month old.


Normal blogging will return as soon as I get over the shock that I'm a mother to a toddler already ;)