Showing posts with label Recipes: Desserts/Sweets. Show all posts

Saturday, November 12, 2016

Persimmon with honeyed yoghurt

Hurmaa jogurtiga. Persimmon with honeyed yogurt.

How do you enjoy the persimmons, in season right now?

Here in Estonia we can by mostly the heart-shaped hachiya variety, which is astringent when raw, but meltingly sweet when ripe. We usually just wash them and cut into wedges, but there's also this super-easy and lovely way of serving them, adapted from the Australian Persimmon Inc page here.

Remember, only try this with perfectly rip persimmons unless you want to be utterly disappointed.

Persimmon with honeyed yoghurt
(Hurmaa mesise jogurtiga)
Serves 4

400 grams Greek yogurt
1 large hachiya persimmon
4 tsp of runny honey
fresh thyme leaves

Divide yoghurt between four small dessert bowls or glasses.
Wash and dry the persimmon (no need to peel!), cut into thin wedges. Top the yoghurt with 2-3 persimmon slices. Drizzle some honey on top, garnish with fresh thyme leaves and serve.

Previously on Nami-Nami:


Tuesday, October 18, 2016

Genius Apple Rollups aka Crispy Apple Bread Cigars

Baked Apple Pie Roll Ups. Krõbedad moositäidisega saiarullid.

Those baked apple pie roll ups by Spend With Pennies turned up on social media last week and I decided to give them a go. It's a very good year for apples in Estonia this year, we're inundated with them! A good reason to try out as many new and old apple recipes out there :)

For the original recipe, see Spend With Pennies blog. Here's what I did, using homemade apple jam of course :)

Crispy Apple Roll-Ups
(Moositäidisega saiarullid)
18 "cigars"

18 sliced of white bread
thick and chunky apple jam
50 g butter, melted
cinnamon
demerara sugar or golden caster sugar

Preheat the oven to 180 C/370 F. Take a medium-sized shallow oven dish and brush lightly with melted butter.

Pour the melted butter onto a small shallow dish.

Remove the crusts off the sliced bread, then roll each slice with a rolling pin until flattened thin. Put a heaped tablespoonful of apple jam alongside one end of the flattened bread (see this pic on my Instagram), then roll tighly. Roll the rolled bread quickly in the melted butter, then place into the oven dish, "seam" underneath.

Repeat with the rest of the bread slices and apple jam. When all "cigars" are done and neatly tucked into the oven dish, then sprinkle with cinnamon and sugar (go easy on the sugar, be generous with the cinnamon).

Place the dish into the preheated oven and bake for about 15-20 minutes, until the bread cigars are golden and crispy.

Remove from the oven, let cool a little. Enjoy - eating either with your fingers, or nicely plated with some vanilla ice cream.

Monday, August 08, 2016

Berry muffins, fit for the Queen

Kuningannamuffinid ehk vaarika-mustikamuffinid. Raspberry and blueberry muffins.

For some reason, our northern neighbours, the Finns, call dishes containing raspberries and blueberries (well, actually bilberries) kuningatar-this and kuningatar-that, the prefix kuningatar- meaning the queen. I'm yet to conduct research why this is so (any Finnish readers out there who know? Ritva, perhaps?), but here are some delicious summer muffins containing blueberries and raspberries - and would hence be called kuningatarmuffinsit or "queen's muffins" in Finland :)

I call them simply:

Summer Berry Muffins
(Kuningannamuffinid)
Yields 12 regular muffins

100 g butter, at room temperature
125 g caster sugar
2 tsp vanilla sugar
2 eggs (L)
50-100 ml (about 4-7 Tbsp) milk, buttermilk or kefir
120 g all-purpose flour or fine white spelt flour
60 g wholemeal flour
1.5 tsp baking powder
200 g blueberries and raspberries
pearl sugar (optional)

Cream the butter and sugars until white and soft (I use the paddle attachment of my standing mixer). Add the eggs, one at a time, and whisking thoroughly after adding each egg. Pour in the milk.

Mix the dry ingredients (flours and baking powder), fold into the egg, butter and sugar mixture.

Finally, gently fold in the berries.

Line the muffin pan with paper muffin liners, then divide the muffin mixture into the muffin cups. Sprinkle with pearl sugar, if you feel like.

Bake at pre-heated 200 C (390 F) for 15-20 minutes, until the muffins have risen and are lovely golden brown.

Let cool a little and serve.

These are best on the day they are baked. Here's a sneak peek to the inside of the muffin: my instagram muffin-pic


Kuningannamuffinid ehk vaarika-mustikamuffinid. Raspberry and blueberry muffins.

Monday, March 21, 2016

Lemony bread and butter pudding with custard and berries


It's been a while since my last proper blog post, I know. It's not that I've neglected my food-loving readers, I've just been focusing on my Estonian readers during the last months. Apologies :) But here I am, attempting to start blogging again with this fun take on bread and butter pudding.

Why bread and butter pudding? We were sorting the bread and butter recipes over on my Estonians site with one of my editors, Kaare, and while doing the research, I came across this shortcut version in the British food magazine Delicious. Meanwhile, if you read Estonian, you can check out Kaare's great article on this humble - yet versatile dessert: Millal Sa viimati saiavormi sõid?

Lemony bread and butter pudding with custard and berries
(Saiavorm sidrunivõide, vanillipudingi ja marjadega)
Serves 6 to 8

400 g good white bread (brioche, challah or such like)
butter, softened
500 ml (2 cups) fresh vanilla custard
200 ml double cream/whipping cream
300 g berries (raspberries, blackberries, blueberries)
6 Tbsp lemon curd or toffee/caramel sauce

Preheat the oven to 160°C . Thickly slice the bread and butter one side of each slice. Cut each slice into large triangles or halves and layer in a 2 litre ovenproof dish.

In a 1-litre jug, mix the vanilla custard and fresh cream, then pour in around the bread slices, pressing the bread down gently. If you can, leave to stand and absorb for about half an hour. 

Scatter berries on top, tucking them between the bread slices. Spoon dollops of lemon curd or caramel sauce on top.

Bake in a preheated oven for 40-50 minutes until the bread slices on top are golden brown on edges and nicely crispy.

Leave to rest for 10 minutes before serving. Serve with a jug of cream or milk (pictured). 

How do you make bread and butter pudding?

Friday, September 12, 2014

Whipped semolina pudding with apples and black aronia berries

Aroonia-õunamannavaht & arooniasmuuti / Black aronia smoothie and black aronia and apple pudding
Recipe by Pille @ Nami-NamiAbove photo by Juta Kübarsepp for the October 2012 issue of Kodu ja Aed ("Home and Garden", an Estonian monthly magazine. I've been their food writer since October 2012). 

Back in July 2013, The Wall Street Journal touted the slightly astringent and tart black aronia as possibly the next superberry. While WSJ listed it alongside other health-giving berries, Fox News wrote more directly: Aronia: The North American super berry with cancer-fighting properties., calling aronia the "King Kong of antioxidant berries" (other than that, it's actually a pretty good and informative article). In a word - it's a great berry that's very good to you!

Black aronia berry has been popular here in Estonia for decades - it makes a beautiful hedge plant, especially in the autumn:

Black aronia / Must aroonia

See what I mean? The aronia plant has most beautiful dark red leaves in the autumn!

Usually the berries are used to make cordial, though they can be used in so many other ways. I often throw a handful of berries into my smoothie, and I've provided links to various recipes below. Here's a simple autumnal pudding, using apples, aronia berries and cream of wheat/semolina.

Black aronia and apple whipped semolina pudding
(Aroonia-õunavaht)
Serves 4 to 6

1 l (4 cups) water
500 ml (2 cups) of cleaned black aronia berries and apple chunks
100 g caster sugar
a pinch of salt
200 ml semolina/cream of wheat (wholewheat or spelt semolina is fine, too)

Put the aronia berries and chopped apples into a saucepan, pour over the water. Bring into a boil, then reduce heat and simmer for about 15 minutes, until the aronia berries have softened.

Take a bowl (or another saucepan) and cover with a sieve. Pour the cooked apples and black aronias - and their boiling liquid - onto the sieve and using the back of a wooden spoon, press as much of the fruit through the sieve. Season the mixture with sugar and a pinch of salt. Bring into a boil.

Pour semolina quickly into the boiling mixture, stirring vigorously to avoid any lumps. Then reduce the heat and simmer gently for 10-15 minutes, stirring every now and then, until semolina - and the pudding - thickens. Remove the pan from the heat and leave to cool for about half an hour. Whisk until fluffy and light - this is best done with an electric mixer.

Serve with milk.

More recipes using black aronia berries aka chokeberries:
Black aronia muffins @ Nami-Nami
Black aronia and kefir smoothie @ Nami-Nami
Aronia jam @ Blooms 'n' Food
6 recipes @ Deep Roots
Aronia jam @ Sto kolorow kuchni (recipe in Polish)
Black aronia soda @ ferdakost
Vispipuuro omenasta ja marja-aroniasta by Riikka @ (recipe in Finnish)
Vispipuuro marja-aroniasta @ Omenaminttu (recipe in Finnish)
Vispipuuro marja-aroniasta ja mustaherukasta by MariMaalla @ Lily (recipe in Finnish)
Aroniaglögi @ Omenaminttu (recipe in Finnish)
Aronia-omenakisselli @ Omenaminttu (recipe in Finnish)
Aronia and rye foam by Malitsu @ Mämmi

(From the recipe archives: this post was originally posted in September 2013)

Wednesday, September 10, 2014

Quark and pumpkin pudding cake

Kõrvitsa-kohupiimavorm. Pumpkin and curd cheese.

Recipe by Pille @ Nami-NamiAbove photo by Juta Kübarsepp for the October 2013 issue of Kodu ja Aed ("Home and Garden", an Estonian monthly magazine. I've been their food writer since October 2012). 

Pumpkin or winter squash dessert, anyone?

There's a popular old-school dessert here in Estonia, called kohupiimavorm. It consists of curd cheese (also known as quark), sugar, (whisked) eggs, and some add-ons, usually raisins or pieces of fruit. It's not really a cake (too soft), nor a soufflé (no custard base), so after some research I've decided to translate it as pudding cake :) Pudding cake is a cake you need to eat with a spoon, and it's rather difficult to cut it into neat shapes when still warm.

Here's a version using that autumn staple, winter squash or pumpkin. For once, this is a recipe that's very versatile - if you cannot find curd cheese (try looking for 'tvorog' at your nearest Polish/Russian/international shop), you could use drier ricotta or even farmer's cheese. As for pumpkin, any yellow-fleshed winter squash would work. I like using butternut squash here, as this gives the dessert a lovely dark orange hue. Considering the amount of flour in the recipe, you could easily make this wheat-free or gluten-free by using different types of (gluten-free) flours.

You could eat it as it is, or with a dollop of thick yoghurt or sour cream on the side. It's lovely with a kissel or fruit soup (this cranberry kissel would work brilliantly here). I actually prefer this pumpkin version to the traditional version, as it's softer and moister.

Oh, and if you were wondering what those cookies on the top right corner of the photo were, you'll be pleased to know these contain pumpkin/squash as well. You'll find the recipe for those wonderful pumpkin cookies here.

Curd cheese and pumpkin pudding cake 
(Kõrvitsa-kohupiimavorm)
Serves 6

800 g butternut squash or pumpkin (cleaned weight)
100 g caster sugar
500 g curd cheese
4 large eggs, separated
1 lemon, juiced and zested
2 Tbsp all-purpose flour
100 g dried cranberries (craisins) or seedless raisins
a pinch of salt
butter
breadcrumbs

Pre-heat the oven to 200 C/400 F.

Peel the pumpkin, cut into large wedges. Remove the soft core and seeds, and cut the flesh into large cubes. Weigh the pumpkin cubes - you need about 800 g (just under 2 pounds). Place the cubes into a large saucepan, add a cup of water and simmer over a low heat until pumpkin is tender. Drain thoroughly, then place into a bowl and mash with a fork.

Add lemon juice and grated zest, curd cheese, flour, (c)raisins.

Separate the eggs. Whisk the egg yorks with sugar until creamy, add to the rest of the ingredients. Finally, whisk the egg whites with a pinch of salt until stiff peaks forms. Fold 1/3 of the egg whites into the rest of the ingredients, then gently fold in the remaining egg whites.

Butter a large (round) oven dish - about ∅ 26-30 cm is excellent -  and sprinkle with fine breadcrumbs. Spoon the pumpkin and curd cheese mixture into the dish, smooth the top.

Bake in the pre-heated 200 C/400 F oven for about 40 minutes, until it's lovely golden brown, and just a wee bit wobbly in the middle.

Let cool either completely or serve at room temperature.

(From the recipe archives: this post was originally posted in October 2013)

Similar recipes:

Wednesday, February 19, 2014

Mascarpone and cottage cheese with raspberries

"Risifrutti" aka cottage cheese and mascarpone pudding with raspberries. Kodujuustudessert vaarikatega.

Trying to reduce the amount of carbohydrates, yet missing something sweet and luscious? Then try this low-carb, gluten-free, wheat-free mascarpone and raspberry pudding - either for breakfast, for dessert or just a quick treat between meals.  It's not dairy-free, however - there's some creamy mascarpone cheese and full-fat cottage cheese in there!

I love the dairy products we get here in Estonia. You get excellent butter, kefir, buttermilk, yoghurt, curd cheese and cottage cheese over here - though the cottage cheese we ate daily in Israel back in 2012 (pictured on the left) was even better. The curds in the Israeli cottage cheese were larger, and much softer than here in Estonia - they really did melt in your mouth!  But apart from that, you cannot fault the Estonian dairy products. We use them a lot and in various delicious ways - just browse through the Estonian recipes on my blog to see all the cakes, desserts and pastries - and even savoury dishes - requiring curd cheese (tvorog/quark/rahka) or the farmers cheese/cottage cheese.

I adopted the recipe from Madbanditten, a popular Danish LCHF-blog. Jane (the blogger) added some sweetener into the dessert as well, which I didn't have nor missed at all - mascarpone is so rich and creamy that it fully satisfies your tastebuds without any added sweetener :)

Simple mascarpone and raspberry pudding
(Kodujuustudessert)
Serves 2

100 g full-fat cottage cheese (also known as farmer's cheese)
100 g mascarpone cheese
0.5 tsp vanilla extract or powder

To serve:
raspberries

Combine cottage cheese and mascarpone in a bowl, add vanilla and mix again. Fold in some raspberries, serve at once or keep covered in the fridge until ready to eat.

Wednesday, February 12, 2014

Chia, banana and coconut pudding recipe

Banana and chia coconut pudding. Banaani-kookosepuding chia-seemnetega.

It took me a while to like chia seeds. I was well aware of all the benefits of enjoying some chia seeds every now and then (if you're not, then check out this article over at Huffington Post), but they reminded me of frogspawn and I wasn't really interested. Yet somehow a packet of chia seeds did find a way into my kitchen cupboard recently and I've been adding a serving (2 Tbsp) here and there. And you know what - they still look like frogspawn when mixed with liquid and left to stand for a while - but they taste actually nice and I quite enjoy the texture now.

Today's recipe is for a simple banana, chia and coconut pudding. Many bloggers use almond milk (see a list of similar recipes at the end of this post), but I never have that at home, so I use coconut milk instead. Enjoy this for breakfast, dessert or a quick snack.

You'll need an immersion blender for making this pudding.

Banana, chia and coconut pudding
(Banaani-chia-kookosepuding)
Serves 1

1 very ripe banana
100 ml coconut milk
2 Tbsp chia seeds
a dash of vanilla extract

Peel the banana, cut into chunks and place into a tall glass or jug. Add the coconut milk and blent until smooth.
Add the chia seeds, blend for a second, just to distribute the chia seeds evenly. Season to taste with vanilla.
Leave to stand for an hour, so the chia seeds can suck in some of the coconut milk.
Serve with a small spoon.

Banana and chia coconut pudding. Banaani-kookosepuding chia-seemnetega.

Similar recipes:
Three-ingredient banana chia pudding @ Run Eat Repeat
Banana chia pudding @ Healthy Living How To
Banana coconut chia seed pudding @ Slender Kitchen
Chia seed breakfast bowl @ Oh She Glows (Angela has great topping suggestsions as well!)

Wednesday, October 30, 2013

Apple crumble, the perfect autumn dessert

Õunakrõbedikud kaneelise toorjuustuvahuga / Apple crisps with cinnamon cream cheese
Recipe by Pille @ Nami-NamiAbove photo by Juta Kübarsepp for the November 2012 issue of Kodu ja Aed ("Home and Garden", an Estonian monthly magazine. I've been their food writer since October 2012). 

As for the perfect autumn dessert, you cannot go wrong with a classic apple crumble. Surprisingly apple crumble - or crumbles in general - aren't particularly well-known in Estonia - we're more cake and pie and tart type of people, I guess. I love adding oats to my crumble topping - or any other porridge flakes (rolled spelt or rye flakes work brilliantly, for example). Oat addition makes the crumble somewhat healthier and the topping more crunchy. If you have some red-skinned crab apples - like the ones on the photo above - add those to the apple mixture for extra colour.

I served the crumble with a cinnamon and cream cheese whipped cream - a wonderfully aromatic addition to the crumble.

Apple crumble
(Õunakrõbedik)
Serves six

600 g tart apples (f. ex. Antonovka, Granny Smith)
25 g seedless raisins
25 g caster sugar
ground cinnamon

Crumb topping:
100 g all-purpose wheat flour
50 g porridge oats or rolled rye or spelt flakes
100 g cold butter
50 g demerara brown sugar

Peel* and core the apples, cut into smaller chunks or sectors. Place into a bowl, toss together with raisins, sugar and cinnamon. Transfer into a buttered 24 cm pie dish or 4-6 portion dishes/ramekins.

Combine the flour, rolled grains and sugar in a bowl. Cut the butter in with two knifes or a pastry cutter or simply using your fingers. (Or simply put everything into the food processor and pulse until you've got pea-sized pieces). Spread the crumb topping over the apples.

Place in the pre-heated 200C/400F oven and bake for about 30 minutes, until the apples are soft and the topping golden brown and crispy. Let cool for about 15-30 minutes before serving.

Serve with cinnamon-flavoured cream cheese, vanilla custard, vanilla ice cream or simple whipped cream.

* There's no need to peel organic apples from your own backyard or a reputable orchard.

More crumble recipes:
Rhubarb crumble @ Nami-Nami (gluten-free, if using certified gluten-free oats)
Raspberry and coconut crumble @ Nami-Nami
Pumpkin and apple crumble @ Nami-Nami
Apple cinnamon crumble @ Two Peas and Their Pod
Speculoos + Apple Crumble @ Dorie Greenspan
Butterless apple crumble @ Chocolate & Zucchini

Thursday, September 12, 2013

Green smoothie recipe

SeptembriRetsept13 _04

Recipe by Pille @ Nami-NamiAbove photo by Juta Kübarsepp for the September 2013 issue of Kodu ja Aed ("Home and Garden", an Estonian monthly magazine. I've been their food writer since October 2012)

Here's a recipe for a healthy and delicious pick-me-up smoothie for those days that kids have been driving you crazy, the to-do-list doesn't seem to get any shorter however hard you try, and you simply have no time to cook anything decent for yourself. It's the matter of peeling three fruits and throwing them into the blender (and rinsing the blender afterwards). I'll find time for that any day :)

The green smoothie - if the name didn't give it away already - is the one third from the left on the above photo. Feel free to guess what the other three are ;)

Green smoothie
(Roheline smuuti)
Serves 2

2 kiwis
1 banana
1 avocado
200 ml orange juice*

Peel the banana, kiwis and avocado. Place the flesh into your blender. Add the orange juice and process till smooth. Serve at once.

If you want your smoothie thinner, then add more orange juice, ice or ice-cold water.

* Ideally freshly squeezed, but any good-quality bottled juice will work as well.

Tuesday, July 16, 2013

Raspberry and Coconut Crumble Recipe

Raspberry and coconut crumble. Vaarika-kookoshelbevorm.

This recipe was originally posted in August 2008. Fully revised and updated in July 2013.

If you are looking for recipes using those lovely raspberries in your backyard or farmers market, then may I suggest this raspberry and coconut crumble. It's easy to put together and it's a great alternative to more cake-like concoctions.

I've served it both with vanilla ice cream and thick yogurt/sour cream, and currently prefer the latter, as it's not as sweet then - just fruity and summery :)

Raspberry and Coconut Crumble
(Vaarika-kookosevorm)
Adapted from Swedish Allt of Mat magazine (12/2008)
Serves 6

Vaarika-kookosevorm. Raspberry and coconut crumble.

400 g fresh or frozen raspberries
2 Tbsp sugar
1 tsp potato starch/potato flour or cornflour

Crumble topping:
150 g butter
180 g coconut flakes (unsweetened, I used MEIRA)
85 g (100 ml (less than half a cup) caster sugar
60 g (less than half a cup) plain/all-purpose flour

To serve:
whipped cream (season with vanilla, if you like)

Gently mix raspberries with sugar and potato flour and scatter on a buttered pie dish.

Melt the butter. Combine coconut flakes, sugar and flour in a medium-sized bowl, pour over the melted butter and stir until combined. Crumble the mixture on top of raspberries.

Bake in the middle of a pre-heated 180 C/350 F oven for 15-20 minutes, until the coconut crumble is light golden brown.

Serve warm or cold with some whipped cream, vanilla ice cream or Saare Smetana.

Vaarika-kookosevorm. Raspberry and coconut crumble.

More raspberry recipes @ Nami-Nami:
Raspberry cheesecake brownie
Raspberry and vanilla friands with raw cacao nibs
Kefir jelly with raspberry jam
Chocolate brownie with raspberries
Raspberry and mascarpone fluff
Raspberry focaccia
Chocolate and raspberry muffins
Bakewell pudding

Recipes combining raspberries and coconut @ other foodblogs:
Raspberry and coconut macarons @ Smitten Kitchen
Vegan Coconut Raspberry Ice Cream @ Two Peas and Their Pod
Raspberry tart with coconut crust @ Lottie and Doof


Tuesday, May 07, 2013

Pineapple carpaccio with mint sugar

Ananassiviilud mündi ja suhkruga / Pineapple carpaccio with mint sugar
Photo by Juta Kübarsepp for Nami-Nami/Kodu ja Aed, 2013

I know all my far-away readers - at least those on the Northern hemisphere -  are feasting on rhubarb and early strawberries already, but neither one is ready for consumption here in Estonia just yet. The local rhubarb should be ready in a fortnight or so, strawberries in 5-6 weeks. Until then I'll resist buying the imported stuff. Pineapple, however, doesn't grow locally anyway, so I must buy the imported fruit if I want to enjoy some.

Here's a quick dessert idea, originally popularised by Jamie Oliver. You'll find the recipe for "Pukka pineapple with bashed-up mint sugar" - that so Jamie, don't you think? - either in his book Happy Days with Naked Chef or on his website. I've been making this for years, and it's not the first time it's been mentioned here on Nami-Nami - I was served at our 2009 Easter Brunch. A great idea, really quick, and again, suitable for many popular diets (it's gluten free, vegan, raw*, etc).  Note that I gave up bashing up the mint and sugar long time ago, and simply sprinkle these on top. Works just as well.

* Use either a really sweet pineapple and omit the sugar, or use Sucanat or some of the other allowed sweeteners listed here.

Pineapple carpaccio with mint and sugar
(Ananassiviilud mündi ja suhkruga)
Serves 4

Easter brunch / Kevadpühade brantš

1 small, sweet and very ripe pineapple
2-3 Tbsp caster/superfine sugar
a handful of fresh mint leaves

Top and tail the pineapple. Cut off the skin and remove the "eyes". Then cut the pineapple into four wedges and remove the hardened core. Cut into thin slices, place onto a serving plate.

Chop the mint leaves finely, mix with sugar and sprinkle onto the pineapple slices. Leave to macerate for half an hour or serve immediately.

Similar recipes:
Pineapple carpaccio with mint sugar by Anna @ Morsels & Musings (same recipe)
Pineapple carpaccio with mint and rum marinade by Silvia @ Citron & Vanilla
Pineapple carpaccio @ Kitchen Delights
Pineapple carpaccio with saffron syrup and pinenuts @ MyFrenchKitchen
Pineapple carpaccio, candied ginger and lime by Anne @ A Foodie Froggy in Paris

Sunday, April 07, 2013

Recipe for DIY Bounty bites aka homemade Mounds candy bars

Bounty Bites / Bounty kompvekid

Some home-made candy bars for a change. If you live in the US, then you'd think of these as Mounds, the candy bar produced by Hershey's. Everywhere else - including UK and Canada - you'd recognise these as Bounty, the candy bar produced by Mars Inc. A dense and sweet coconut centre, enrobed with either dark or milk chocolate.

I used milk chocolate (the American equivalent would be Almond Joy without the almonds :)), and made small cubes instead of the traditional oblong bar shape. I must admit we ate half of the coconut cubes before we even dipped them into chocolate :)

There are links to several homemade Bounty/Mounds recipes at the end of this post - do check these out as well.

DIY Bounty bites aka home-made Mounds candy bars
(Kodune Bounty)
Makes about 3 dozen

Bounty bites / Bounty kookosekommid

Coconut filling:
300 g desiccated unsweetened coconut flakes
300 g sweetened condensed milk
150 g butter, at room temperature

Chocolate glaze:
300 g dark or milk chocolate

I used the mixing bowl of my standing mixer, but you could also simply use your hand muscles to prepare the coconut mixture.

Place the butter and coconut into the mixing bowl and mix thoroughly - about 1-2 minutes. Add the condensed milk and mix for another 2-3 minutes, until thoroughly combined.

Line a small baking sheet/tray/tin with a parchment/baking paper. Transfer the coconut mixture into the tin and press into a block about 2 cm/0.8 inches high. Cover and put into the fridge for about 3 hours or freezer for about 1 hour.

Remove from the fridge/freezer, transfer the coconut block onto a cutting board and cut into 2x2 cm (0.8 x 0.8 inch) cubes. Like this:

Bounty bites / Bounty kookoskuubikud

Now there are two ways to proceed. First, cover a small tray with parchment paper and put aside.

If you prefer your candy bars at room temperature, then melt and temper your chocolate (here's a good article about tempering the chocolate or see my instructions below), dip each coconut cube into the melted chocolate until coated, then place onto the prepared tray. Cool completely, then keep in a cool place until ready to serve.

If you want to avoid tempering the chocolate - or simply like your sweets cold - then you can simply dip these into melted chocolate to coat, then place onto the prepared tray and put into the freezer. The butter and sweetened condensed milk keep these blocks from freezing completely, so you can always just grab one candy bar and enjoy straight from frozen. (This is how I enjoyed them, but then I also like my brownie bites straight from the freezer).

Why and how to temper the chocolate? The Internet - and food blogs - are full of detailed instructions on how to temper chocolate - and why. The latter is easy - unless you temper the chocolate, the chocolate-glazed candy bars/bites will lack the shine and the snap, both very desirable elements. "How" is trickier and indeed, tempering can be a hit-and-miss. I've followed this simplified seed-technique for tempering. Place about 2/3 of your chopped up chocolate (or, indeed, chocolate pellets - and NOT compound chocolate!) into a heat-proof bowl and place the bowl on top of a small saucepan, where you've brought about 5 cm/2 inches of water into simmer. Let the chocolate melt slowly, stirring as you go along. Remove from the heat, stick a chocolate thermometer into the bowl. Now add the "seed chocolate" or the chocolate you put aside at the beginning in two or three installments and keep stirring the chocolate and cooling it. Once all the added chocolate pellets have melted, you must continue stirring the chocolate, until it registers 28 C on the thermometer - that will probably take about 15-20 minutes of active stirring, so be patient! You can then gently re-heat the chocolate - either over the waterbath, on top of a hot water bottle or by hovering your hair-drier over the chocolate - until it's about 30-31 C (best temperature for working with chocolate). 


Other foodbloggers making these:
Batoniki a la Bounty by Ania @ Strawberries from Poland (recipe in Polish)

Similar recipes:
Nourishing and scrumptious "Mounds" candy bars by Kimi @ The Nourishing Gourmet
Homemade Bounty by Dagmar @ A Cat in the Kitchen
Homemade coconut Bounty candy bars by Christina @ Scientifically Sweet
Mounds candy bars by Elena @ Elena's Pantry
Homemade Bounty bars by Louise @ Lick that Spoon
Homemade Bounty by Eva @ Made by Eva
Easy homemade Bounty bars aka Mounds by Marie @ Not Enough Cinnamon
DIY Bounty barres by Emilie @ Emilie and Lea's Secrets (recipe in French)
Isetehtud Bounty šokolaad by Sandra @ Sentjurin Food Production (recipe in Estonian)
Kookoskommid šokolaadis ehk kodused Bounty'd by Teevi @ Ampsukas (recipe in Estonian)
Kookostrühvlid by Silja @ Jagatud rõõm (recipe in Estonian)

Wednesday, November 28, 2012

Orange salad with pomegranate seeds, perfect for the festive season

Orange salad / Apelsinisalat

Citrus fruit and Christmas go hand in hand, no? Well, in my house they do. I like serving an orange salad during the festive season - either as a starter, like this beetroot and orange salad with ginger yoghurt dressing or this fennel and orange salad with a simple vinaigrette or even this super-simple orange and red onion salad. Or as a dessert, in a form of a simple "Orange Ambrosia, for instance.

When flipping through the pages of one of my current favourite food magazines, the Swedish-language Lantliv mat & vin, I was immediately drawn to a pretty orange and pomegranate salad. And although Christmas is still a few weeks away, we've had some snow in Estonia already - and it's snowing outside as I'm writing this post - so this salad has been sitting prettily on our table twice during the last week or so. And it'll be definitely making an appearance or two during December.

It'd make a lovely light dessert, or simply one of the dishes on your festive buffet spread. It's also vegan and gluten-free, so suits all kind of special diets.

If you're making this in Estonia and are looking for crushed cardamom seeds, then I recommend buying MEIRA cardamom - it's coarsely ground. If you're looking for fine cardamom "dust" (sorry, powder), then Meira is not for you :) Alternatively, buy whole cardamom pods and grind your own. You'll need seeds from about 20 cardamom pods to get about a teaspoon of ground cardamom. 

Orange salad with pomegranate seeds
Apelsinisalat granaatõunaseemnetega
Adapted from Lantliv Mat & Vin, Nr 6/2012 (Apelsinsallad)
Serves 4, can be easily multiplied

 Orange salad / Apelsinisalat

 4 large sweet oranges
1 ripe pomegranate
1 Tbsp (brown) sugar
1 tsp ground cardamom seeds

Peel the oranges with a sharp knife, then cut into thin slices, crosswise. Arrange nicely on a large plate.
Remove the pomegranate seeds and scatter on top of orange slices.
Mix the ground cardamom with sugar and sprinkle on top of the fruit.
Serve at once or leave to macerate for an hour or two in a cool place, covered.

Sunday, October 07, 2012

Oven-baked toffee apples (from the recipe archives)

Baked apples with almond slices and toffee sauce / Ahjuõunad iirise-mandlikattega
September 2010

This recipe was originally posted in September 2008, but it's still a big favourite with our friends and family, so I decided to showcase this again. It's a wonderful twist on the traditional oven-baked apples, that should appeal to everybody with a sweet tooth.

Oven-baked Toffee Apples
(Ahjus küpsetatud õunad mandli-iirisekattega)
Serves 4 to 6

September 2008

4 to 6 large firm apples

Toffee-almond topping:
50 g almond slices
50 g unsalted butter
200 ml soft brown sugar
200 ml whipping or double cream
1 Tbsp potato starch or cornflour

To serve:
vanilla ice cream

Peel the apples (NB! this is optional, see comment below*), halve and core them. Fit them snugly into a buttered oven-dish, cut-side down.

Mix brown sugar and potato flour/cornflour in a small saucepan. Add butter, almond slices, and fresh cream. Bring slowly into the boil, stirring regularly. Spoon the toffee mixture onto the apples.

Bake in the middle of a pre-heated 200 C / 400 F oven for 20-30 minutes (cooking time depends on the apples), until apples are cooked and toffee topping has thickened. KEEP YOUR EYES ON THE PUDDING and take care not to burn the toffee sauce!!!

Cool a little and serve with ice cream or soft whipped cream.

* In general, I tend not to peel apples from my mum's or grandma's garden, or apples from a reputable organic source. However, peeling apples beforehand does make for neater presentation and easier eating afterwards.

 
This recipe was also included in my first cookbook, Nami-Nami kokaraamat ("Nami-Nami Cookbook"), published in Estonian in December 2010.


Tuesday, July 17, 2012

Recipe for an ice-cold wild strawberry coulis with warm marzipan cheesecake

Semi-frozen wild strawberry soup with warm marzipan cheesecake / Jäine metsmaasikasupp sooja martsipani-toorjuustukoogiga

We've had better summers than the current one. It's been raining a lot, the temperatures are a few degrees below the usual over-20C, and the sunshine has been limited. Quite sad, actually, but apparently that's the case with most central and northern European countries this year.

However, on Saturday morning the rain had stopped, the skies had cleared and the sun was out, so we packed our little family into the car, picked up one of the grandmothers and drove out of town to forage for wild strawberries. Couple of hours and a healthy dose of fresh country air later we returned home with just about a kilogram (over 2 pounds) of the precious berries. (Note that I'm talking about the real wild berries, Fragaria vesca, not the oblong cultivated Alpine strawberries, Fragaria vesca var. semperflorens).

 A litre of delicious wild strawberries / Liiter metsmaasikaid
Wild strawberries, picked in June 2007 

Usually I make wild strawberry fridge jam, but I had done that on Friday night with 2,5 kilos of wild strawberries we had bought at a market. The next usual step would be to mix the berries with a sprinkling of sugar and some grass-fed milk, but I had done that already, too. We also had friends coming over for dinner on Saturday night, so I wanted to do something special and different this time.

Remembering that the Swedes love their smultron a lot as well, I turned to their popular Allt om Mat recipe site, and came across this wonderful recipe for an ice-cold/semi-frozen wild strawberry soup with warm marzipan cheesecake.

Warm marzipan cheesecake with cold wild strawberry coulis 
(Jäine metsmaasikasupp sooja martsipani-toorjuustukoogiga)
Serves 6

Semi-frozen wild strawberry soup with warm marzipan cheesecake / Jäine metsmaasikasupp sooja martsipani-toorjuustukoogiga
Cold strawberry coulis:
200 ml water
125 g caster sugar (150 ml)
500 ml wild strawberries (2 cups)
0.5 tsp vanilla extract
1 tsp freshly squeezed lemon juice

Warm marzipan cheesecake:
100 g marzipan
200 g cream cheese (Philadelphia or such like)
2 free-range eggs
2 Tbsp caster sugar
1 tsp vanilla extract

To serve:
wild strawberries 

First prepare the ice-cold wild strawberry soup/couilis. 
Bring water and sugar into a boil in a small saucepan. Boil for a minute, then remove from the heat and stir in the wild strawberries:

 Metsmaasikad siirupis / Wild strawberries in a simple syrup

Using an immersion blender/hand-held blender, process the berries and the syrup until smooth (if you dislike tiny seeds, you can press the whole thing through a fine sieve, but I found it totally unnecessary).
Season to taste with vanilla and lemon juice, then place into the freezer for a few hours.
Give the mixture a stir every now and then.

About 45 minutes before you intend to serve the dessert, make the marzipan cheesecake. 
Preheat the oven to 175 C/350 F.
Grate the marzipan coarsely or simply use your fingers to divide it into small crumbs. Mix with the rest of the ingredients and process until smooth (again, I was using my immersion blender).
Divide the mixture between six buttered small ramekins or silicone muffin/friand tins.
Bake in the middle of the pre-heated oven for about 25 minutes, until the cheesecakes look cooked and are light golden brown.
Remove the marzipan cheesecakes from the oven and let cool for 10-15 minutes.

To plate and serve:
Remove the cheesecakes carefully from the tins and place on six dessert plates. Pour the ice-cold wild strawberry coulis around the warm cheesecakes.
Garnish with wild strawberries - ideally on straw, to bring back those innocent childhood memories :)

More posts about wild strawberries:
Wild strawberry fridge jam
Picking wild strawberries in 2006
Wild strawberries and cream
Fraises des bois  @ David Lebovitz
Wild strawberries from the garden @ Chocolate & Zucchini
Maapealne paradiis ehk seitse liitrit metsmaasikaid  @ Koopatibi küpsetab (in Estonian)

Friday, July 13, 2012

Endomela ice cream shop in Akko, Israel, and a recipe for a wonderful apricot sorbet

Apricot sorbet / Aprikoosisorbett  
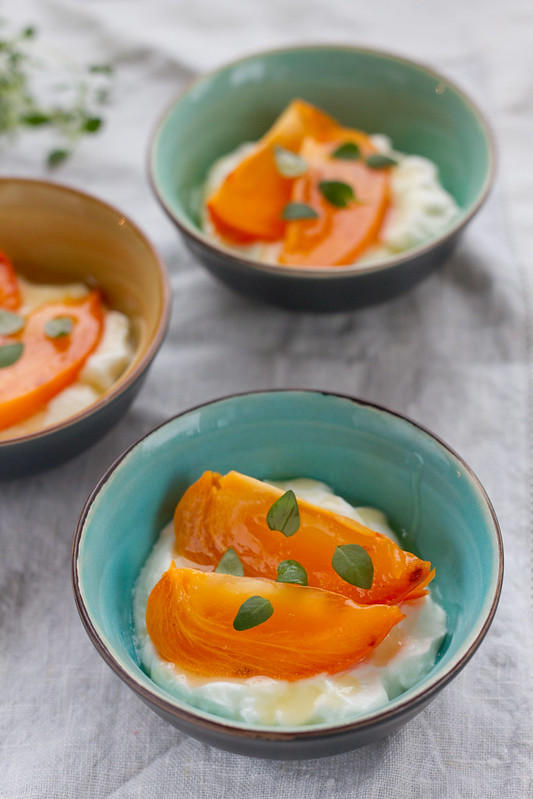
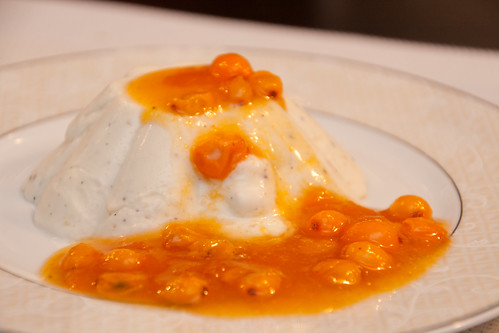
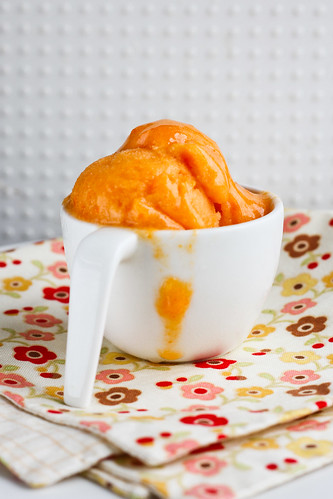
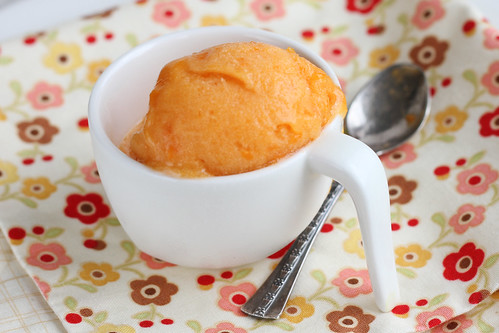
You'll find the recipe for this wonderfully aromatic and flavoursome apricot sorbet at the end of this post.  

Endomela is a play of three Hebrew words, Ein-Dome-La. The meaning? "Similar to none" or "Unlike no other". This is the name of a small ice cream parlour in Akko (known as Acre in English), a small town in the Western Galilee region of northern Israel. Akko was first mentioned on the tribute-lists of pharaoh Thutmose III in the 16th century BC, and is considered to be one of the oldest continuously inhabited settlements in this part of the world. A place with history indeed.

We visited Akko in the midday heat in the middle of the hot Israeli summer, so it was hard to grasp that the city is a home to some 45 thousand inhabitants. I guess that most of them were hiding in the safety of their cool and possibly air-conditioned homes and not wandering around the streets.

We were in Akko for a reason, of course. As we were exploring the culinary delicacies Israel has to offer, we had arrived to have a light lunch at a famous seafood restaurant URI BURI, meet the man behind the restaurant, Uri (Jeremias) Buri (pictured just below), visit his ice cream shop and enjoy a private tour of his recently opened beautiful boutique hotel Efendi and finish with a "light" tapas-style lunch at the hotel restaurant. I'll write about the fish restaurant and the hotel another time, today I'll give you a peek into his ice cream shop, the smartly-named Endomela.

Uri Buri (Uri Jeremiah) & me at his Endomela ice cream parlour. Akko, Israel.

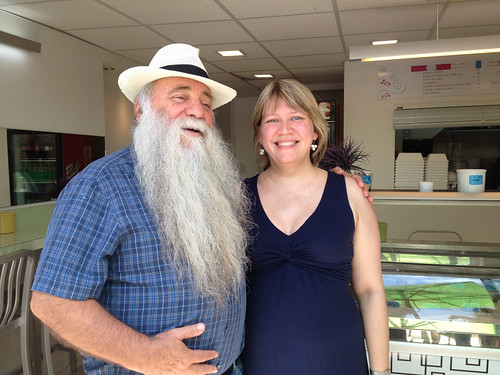
Here's Uri Jeremias aka Uri Buri and me in front of his ice cream shop in Akko. American journalist Eric Westervelt described Uri Jeremias in his article for NPR.org as having stepped out of a Tolkien novel, with "his thick, long, elfish beard, ample paunch and mischievous smile". My 3,5 year old daughter is convinced that I was served ice cream by Santa Claus/Father Christmas himself :)

Uri (Jeremias) Buri had been making and serving ice cream at this fish & seafood restaurant for years, but as the restaurant's kitchen is tiny, he had to move out his ice cream business into separate premises. He opened Endomela within a short walking distance from his restaurant just over a year ago. In addition to a number of sweet sorbets, ice creams and frozen yoghurts, he also makes some intriguing savoury combinations. We had a taste of this wasabi-sorbet, served with smoked salmon, as well of arak-flavoured sorbet destined as a palate-cleanser between various fish courses at his restaurant. 

Endomela, Akko/Acre, Israel

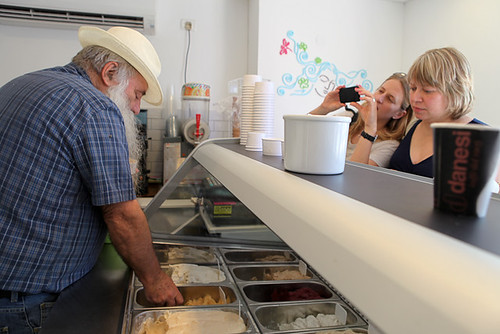
Uri scooping some of his lovely ice cream for us. (Photo by Noa Magger). We got to sample pretty much all the available flavours.

Endomela, Akko/Acre, Israel
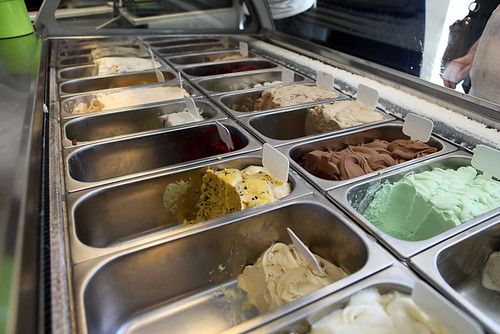
Endomela's ice cream selection. (Photo by Noa Magger).

All ice cream is made at the premises and in small batches. At the time of our visit, they were churning a very refreshing pineapple sorbet. My very favourite one was Endomela's mint ice cream - so fresh and minty, definitely not your regular beach-front chocolate and mint concoction (you can see it on the right on the photo above). Uri told us he uses a combination of spearmint "Nana" (Mentha spicata, Israelis call it sweet mint or nana) and the highly aromatic Emperor's mint or Roman mint (Micromeria sp)  to achieve the immensely refreshing and bright minty flavour.

The runner-up was Endomela's apricot sorbet. Yet pretty much everything else we tried was wonderful as well - cardamom ice cream, passionfruit sorbet, halva ice cream, lime and poppyseed frozen yoghurt - you name it.

I've made apricot ice cream before, but not apricot sorbet, and that's what I decided to replicate at home first. As the reigning king of all things ice cream and sorbet, David Lebovitz, was also taking part in our trip to Endomela, I decided to use his recipe as a base. I know David provides his recipes both in Imperial and Metric, but his starting point is still the pound and not a kilo, so I did some minor revisions (if I'd ask for 900 grams of apricots or 110 grams of chocolate chips in a store, I'd get very weird looks. While these amounts would make perfect sense to someone who's grown up with pounds and ounces, then 900 grams (2 pounds) of apricots and 110 grams (1/4 of a pound) of chocolate would make perfect sense. For us, it's a weird 100 grams less than a kilo and a funny 10 grams more than 100 grams, if you know what I mean). I also reduced the amount of sugar just a tiny bit, as the apricots I was using were very sweet and very ripe (ripeness and the amount of fruit sugar are related, you see).

French apricots, Marche de Saint-Antoine, Lyon
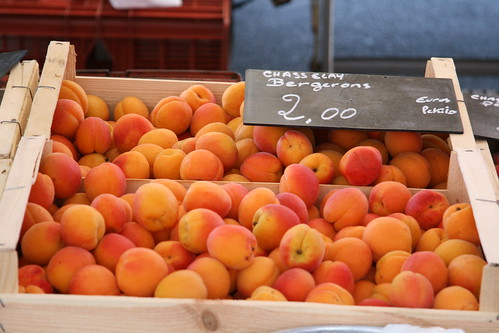
The Bergeron apricots @ Marche de Saint-Antoine, Lyon, France. August 2009
 
My favourite apricots for making all kinds of desserts are the French Bergeron ones. This time I used a lovely Spanish alternative - dark orange, very sweet and just a perfectly slightly acidic. You may add more sugar or a dash of lemon juice to the sorbet mix, depending on the type of apricots you're using.

Apricot Sorbet
Slightly adapted from David Lebovitz's excellent book The Perfect Scoop
Makes about 1 litre

Apricot sorbet / Aprikoosisorbett

1 kg very ripe apricots (that's just over 2 lbs)
250 ml/1 cup water
200 ml/170 grams caster sugar (that's 1 cup minus 3 level Tbsp)
0.5 tsp vanilla extract

Split the apricots in half, remove the stones, and cut each half into thirds.
Place the apricot pieces and water in a medium saucepan, cover. Cook over medium heat for about 10-15 minutes, stirring occasionally, until apricots are softened and begin to fall apart.
Remove from the heat, stir in the sugar and let the mixture cool to room temperature.
Once cool, pureé the mixture in a food processor or blender until smooth. Season with vanilla. Cover and chill thoroughly in the refrigerator, preferably overnight.
Freeze the mixture in your ice cream maker according to the manufacturer’s instructions.

Similar posts:
Erin Zimmer of Serious Eats writes about Endomela: Snapshots from Israel: Uri Buri and his ice cream.
Other posts about my trip to Israel.
Other ice cream and sorbet recipes here on Nami-Nami.
More ice cream and sorbet recipes on David Lebovitz's blog.

* Disclaimer: I spent six days in Israel in late June/early July as a guest of a non-profit social start-up Kinetis, more specifically their Vibe Israel programme. This particular trip hosted five international food bloggers and writers, introducing them to the multifaceted and pluralist Israeli culture and cuisine. Visit to Uri Buri restaurant, the Efendi Hotel and the adjacent ice cream parlour Endomela in Akko/Acre in the Western Galilee region of northern Israel was part of that trip.

Monday, January 23, 2012

Molten Chocolate Cake, the way I like it

Molten chocolate cake / Šokolaadivulkaanid

You've seen this recipe on Nami-Nami already, back in 2007, but I'll repost it with slightly better step-by-step photos of eating process, not baking process :) These are super easy to make, and will bring a smile to every chocolate lover's face (that covers pretty much everyone, no?). The worst thing that can happen is that you overbake the cakes, but in that case you'll end up with wonderful chocolate cakes.

Molten chocolate cake / Šokolaadivulkaanid

Molten Chocolate Cake
(Šokolaadivulkaanid)
Source: Food Migration

170 grams bittersweet chocolate
150 grams butter
160 grams sugar
75 g plain flour
4 large eggs

Butter six small ramekins thoroughly and dust with cocoa powder (a trick I nicked from David's blog). Place on baking tray.
Melt chocolate and butter in a small saucepan, remove from the heat.
Beat eggs and sugar together until thick, pale and fluffy. Add the melted chocolate and butter mixture. Continue to beat for another five minutes.
Add flour, beat for two more minutes.
Pour mixture into prepared ramekin tins.
Bake in a 180 C oven approximately 10 to 12 minutes - NO MORE! (Ovens do vary, so I'd test for doneness earlier rather than later).

Molten chocolate cake / Šokolaadivulkaanid

Carefully turn the puddings onto serving plates. Dust with powdered/icing sugar and serve at once, when the puddings are still warm - otherwise you won't get that oozing chocolate effect :)

Molten chocolate cake / Šokolaadivulkaanid

A good and slightly melted vanilla ice cream is a good accompaniment. Or perhaps some cherry compote?

Molten chocolate cake / Šokolaadivulkaanid

Wednesday, December 28, 2011

Cardamom panna cotta with apricot and sea-buckthorn sauce

Cardamom pannacotta with apricot and sea-buckthorn topping / Kardemonine pannacotta aprikoosi-astelpajukompotiga

Panna cotta is a dessert that I actually make quite often, even if I've only blogged about it once (Vanilla panna cotta with roasted rhubarb, back in June 2008). It's a good classic Italian dessert that can be served with a number of various toppings and seasoned to your liking.

Here's a rather non-Italian version that is imminently suitable for the festive season. It has a hint of spice in the form of cardamom, and it's much lighter, as some of the cream has been substituted with kefir. Sea-buckthorn berries are one of the new superfoods, and hugely popular and easily available in Estonia. A word of warning - if you taste the panna cotta mixture before you let it set, it may feel too heavy on cardamom. Don't panic, however - the sweet and sour apricot and sea-buckthorn sauce will nicely balance it out.

I like my panna cotta to be on the wobbly side, as they're supposed to be, and I often serve them in a nice glass. If you want a firmer dessert that will hold its shape even after you've turned it onto a plate, you can use some more gelatine.

Cardamom panna cotta with apricot and sea-buckthorn sauce
(Kardemonine kooretarretis aprikoosi-astelpajulisandiga)
Adapted from the Swedish COOP-website
Serves 4

3 gelatine leaves
200 ml whipping cream
2 Tbsp caster sugar
1 tsp ground cardamom
200 ml kefir

Topping:
100 ml (7 Tbsp) smooth apricot jam
100 ml (7 Tbsp) sea-buckthorn berries

Seak the gelatine leaves in cold water for 5 minutes.
Season the cream with ground cardamom, then slowly bring into a boil in a small saucepan. Cook for a few minutes, then remove from the heat and pour in the kefir. Give it a stir.
Squeeze the soaked gelatine leaves to remove excess water, then stir and melt into the cream and kefir mixture, one at a time.
Pour the mixture into individual glasses or ramekins and place into a fridge to set for at least 5 hours.
Before serving, heat the apricot jam gently in a small saucepan. Fold in the sea-buckthorn berries, heat through. Cool a little, then spoon some on top of each panna cotta.

Saturday, December 10, 2011

Homemade candy recipes: fruit and nut truffles

Puuviljakommid (vasakul) / Dried fruit and nut chocolates (on the left)

There's a candy I remember from my childhood. Our main chocolate factory, Kalev, was (and probably still is) well-known for its chocolate selections or "assortiikarp" as they're known in Estonian. I loved their ganache and praline filled chocolates in those chocolate selections, but my favourite ones were the foil-wrapped large truffles with fruit and nut filling.

Here's my attempt to recreate these childhood favourites :) You can see the final product on the left on the photo above.

Fruit and Nut Filled Truffles
(Puuviljakompvekid)

Puuviljakommide tegemine

100 g dried soft figs
150 g dried soft prunes
100 g dried cranberries or cherries (or a mixture of both)
100 g chopped almonds or hazelnuts
1 Tbsp runny honey or golden syrup or agave nectar
a pinch of sea salt

to coat the truffles:
dark chocolate (tempered, preferably)

Remove the stem from the dried figs. If using a food processor, place the figs, prunes and dried cranberries or cherries into the food processor and process until you've got a coarsely ground fruit mixture. Add the almonds/nuts, salt and honey/syrup and pulse again once or twice. (You don't want the nuts chopped too finely, as you want the texture later).
     [You can also simply chop the ingredients as finely as possible]
Place the truffle mixture into the fridge for an hour to cool and harden.
Roll into small balls (TIP: use a little oil to moisten your hands - the mixture won't stick as much then.)
Either dip into melted dark chocolate - or, preferably, into tempered dark chocolate (see note below) until completely covered. Decorate with chopped nuts. Keep in a cool place until ready to serve.

Why and how to temper the chocolate? The Internet - and food blogs - are full of detailed instructions on how to temper chocolate - and why. The latter is easy - unless you temper the chocolate, the chocolate-glazed truffles will lack the shine and the snap, both very desirable elements. "How" is trickier and indeed, tempering can be a hit-and-miss. I've followed this simplified seed-technique for tempering. Place about 2/3 of your chopped up chocolate (or, indeed, chocolate pellets - and NOT compound chocolate!) into a heat-proof bowl and place the bowl on top of a small saucepan, where you've brought about 5 cm/2 inches of water into simmer. Let the chocolate melt slowly, stirring as you go along. Remove from the heat, stick a chocolate thermometer into the bowl. Now add the "seed chocolate" or the chocolate you put aside at the beginning in two or three installments and keep stirring the chocolate and cooling it. Once all the added chocolate pellets have melted, you must continue stirring the chocolate, until it registers 28 C on the thermometer - that will probably take about 15-20 minutes of active stirring, so be patient! You can then gently re-heat the chocolate - either over the waterbath, on top of a hot water bottle or by hovering your hair-drier over the chocolate - until it's about 30-31 C (best temperature for working with chocolate).