Showing posts sorted by relevance for query halloumi. Sort by date Show all posts

Wednesday, November 08, 2006

Take three ingredients: red peppers, salty halloumi cubes and a pinch of cumin

Peppers with halloumi / Halloumi-täidisega paprikad

That's the whole recipe. Just three ingredients (plus some olive oil), ca 20 minutes and you've got an unusual and flavoursome dish on your plate. I've already blogged about the wonderful mint-infused and very salty white cheese, halloumi, that hails from Cyprus. I first wrote about Paul Hollywood's Cypriot mint and halloumi bread, and more recently about fried halloumi slices with chilli oil a la Nigella Lawson. Few days ago I came across a tempting recipe at the Finnish Herkkutori website (click on the last recipe link), that stuffed raw red peppers with fried halloumi cubes and served them alongside bean stew. I'm not too fond of raw bell peppers, so I decided to roast them first, and serve them with halloumi as a meal on its own.

A wonderful dish - if you like halloumi cheese, then do give it a go!

Red peppers with cumin-scented halloumi cubes
(Hallumi-juustuga täidetud paprikad)
Serves 4

4 small red bell peppers, halved and deseeded
250 grams halloumi cheese, rinsed, drained and cut into 1 cm cubes
1 Tbsp of olive oil
1 tsp of cumin seeds

Roast the red peppers in 220˚C oven for about 20 minutes, until they soften.
About 5 minutes before the peppers are ready, heat the oil in a large non-stick frying pan. Add cheese cubes and cumin and fry, turning cheese cubes to brown evenly, for about 5 minutes.
Arrange the peppers on a plate, fill with fried halloumi cubes.
Serve with some rocket salad.

A beautiful combination of salty and squidgy halloumi cheese, soft and sweet pepper and bitter salad leaves.

UPDATE 16.11.2006: Andrew of Spittoon Extra tried this recipe, too. Check out his post. Mia Maailm was also inspired, and made a similar dish using green peppers and mozzarella, but her post is in Estonian :)

Wednesday, July 13, 2005

Baking: Mint and Halloumi Bread

I bought Paul Hollywood’s 100 Great Breads few months ago when I was in a serious bread-baking mood. I had used his recipe for the Greek and Cypriot Easter bread Tsoureki during the Orthodox Easter this May, though back then I didn’t manage to find mahlepi (sour cherry pits) nor mastic (gum resin from mastic tree) anywhere in Edinburgh. I’ve since then managed to buy some in a small Greek shop in London, Bayswater* and am looking forward to baking with these unusual spices (Hollywood has recipes for Cypriot village bread koulouri, and Cypriot Laganes Bread, and I’m also looking forward to trying tsoureki again, this time with all the seasonings; I’ve found several recipes using mahlepi and mastic in Susanna Hoffman's The Olive and The Caper, and Claudia Roden mentions these as well).

Paul Hollywood’s book is alright, with quite a few interesting looking and unusual bread recipes that I’m tempted to try. It has a short introductory chapter about the history of bread and some useful breadbaking hints and tips, but it’s a book for wide rather than specialist audience. I suspect lots of the recipes have been simplified, which is good, especially if you’re looking something easy to bake on a spur of the moment late at night. However, I have a feeling that recipes have not always been properly tested and the editing is poor as well. Think of the above mentioned mastic and mahlepi. On page 78 Hollywood specifies that ‘mastika and mechlebe are spices and seeds used in many Greek/Cypriot dishes. They have a similar flavour to fennel or aniseed, which you can use to replace them. However, most good health food shops will stock them’. But in the Index of the book there are entries for ‘meclebe’ and ‘methlepi’!?!? How did they get the spelling wrong twice and didn’t it occur to them that ‘meclebe’ and ‘methlepi’ are the same thing and should actually be spelt ‘mechlebi’, as it was in the recipes? Or maybe mahlepi, as it is usually spelt in English.

Incorrect spelling and amounts aside, the recipes are tempting. The first recipe I tried was Halloumi and Mint Bread (p 80). I quite enjoyed the recipe, though again, I think the recipe wasn’t correct. Trying to mix 2 packets – that’s 500 grams – of chopped halloumi cheese into a dough made with 500 grams of flour is ambitious. I also think that 20 grams of dried mint (that’s 4 commercial glass spice pots!!!) is outrageous, especially as on the accompanying photo the bread is anything but full of mint (I simply omitted the ‘0’ from the recipe). I’ve also more than halved the amount of salt in the recipe, as cheese is quite salty already**. I suspect that Paul Hollywood’s recipe was originally for more than 1 loaf and while reducing the amount of flour, amounts for some of the other ingredients have remained unchanged. But the bread itself is easy and tasty, soft and dense at the same time and duly recommended. I think I’ve got the amounts correct here.

Halloumi and Mint Bread
(Halloumileib)
Adapted from Paul Hollywood's book 100 Great Breads

500 g strong white flour
1 tsp salt
4 tbsp olive oil
30 g fresh yeast
2-3 dl warm water
250 g halloumi cheese cut into small pieces
a generous tbsp of dried mint

Mix flour, salt, olive oil and yeast in a big bowl, adding water gradually (you may need less, as you’re just trying to bring the ingredients together). Knead for about 8 minutes (or 5, if you are using a mixer). Cover the bowl with a clean towel or clingfilm and leave to rise for 1 hour.
Line a baking tray with parchment paper.
Add the cheese and dried mint to the dough and shape into a longish loaf. Lift to the baking tray and leave to rise for another hour.
Dust the top of the loaf with some flour and bake in a preheated 220˚C/425˚F oven for 25-30 minutes. The bread should be golden brown and crisp on the top.
Transfer to a wire rack to cool, and cover with a kitchen towel if you want just slightly softer top.

Here’s a version I made in early June – with 2 packets of halloumi cheese trying to escape the bread :)
And here’s a slightly modified version I made yesterday – using mint as well as some Greek oregano, 1 packet of halloumi cheese (that proved to be more than enough) and some pitted Greek style black olives that I had in my cupboard after making my entry for the Paper Chef # 8 (therefore the dark speckles that you may have mistaken for burnt cheese):

And finally a close-up of the bread – note the salty white dots of halloumi cheese:

It's almost time for lunch now, so I'm going to have some of the halloumi, olive, mint and oregano bread with some tea..

* Athenian Grocery, Greek-Cyprus & Continental Specialities, Wines and Spirits, 16a Moscow Road, Bayswater, London W2 7AX, Telephone 020 7229 6280
** I also had to modify his recipe for Tsoureki considerably, as I was reluctant to use 30 grams of _dried_ yeast and 15 grams of salt per half a kilo of flour again:)

Friday, April 28, 2006

Nigella, again: fried halloumi with chilli drizzle

Halloumi cheese is something I had never tried until a year ago or so. This white cheese originates in Cyprus, is made from a mixture of goat's and cow's milk, and is seasoned with chopped mint during preparation (you can see a picture here). It has a very unique, slightly squidgy texture, and is one of few cheeses that keeps its shape during heating process, making it ideal for grilling and frying.

Firstly - and mistakenly - I tried it as a sliced cheese on my bread, but found it too squeeky and rubbery, with no proper taste. I then tried it as saganaki, and liked it a bit more. My current favourite way with halloumi is to simply dry-fry it on a frying pan. Heating halloumi slices turns them deliciously soft inside with just a bit of squidge going on. They are wonderful on slices of baguette, for instance. If I want something spicier, I make this simple cheese dish - again by Nigella, this time from the December 2003 issue of Waitrose Food Illustrated. Very slightly modified, as I didn't have any fresh chilli in the house.

Pan-fried Halloumi with Chilli
(Praetud halloumi-viilud)
Serves 4 as a nibble, or 2 as a light meal


250 grams halloumi cheese, sliced not too thinly
2 Tbsp extra virgin olive oil
1 tsp dried chilli flakes
half a lemon

Mix chilli flakes with oil.
Heat a non-stick frying pan on a medium heat (no oil!). Fry halloumi slices for 2 minutes on each side, until the cheese has golden brown speckles all over them.
To serve, put cheese onto small plates, drizzle with chilli oil and a squeeze of lemon juice.
Serve with some salad and bread.

Friday, July 17, 2015

Sautéed garlic scapes with tomatoes

Sautéed Garlic Scapes

Are you familiar with garlic scapes? I've actually mentioned them here on my blog, Nami-Nami, just over ten years ago (YES, NAMI-NAMI BLOG QUIETLY CELEBRATED ITS 10 BLOG ANNIVERSARY IN MID-JUNE) -  when I was still living in Edinburgh. I used to go to the fabulous Edinburgh Farmers Market every weekend, and it's there that I first encountered those spindly scapes, at the stall of Really Garlicky Company (I'm thrilled to see that they're still going strong, those Scottish garlic heroes). I threw those curly garlic tops into stir-fries back then, or chopped them and added to mash.

I grow some hardneck garlic in our beautiful garden these days as well, tucked between our strawberry plants to keep nasty bugs away. Sometimes - but only sometimes - I remember to snip the curly-spindly scapes off in the spring or early summer. This time I did, and made this lovely sauté with tomatoes and cheese. I found a recipe by William Woys Weaver over at Mother Earth News that sounded lovely. Mr Weaver topped his sautéed garlic scapes with cubed and fried halloumi cheese. Although the Cypriot halloumi-cheese is widely available in Estonia, I had none at home. However, as Mr Weaver mentioned that he got an idea for the dish in Slovenia - where local kajmak cheese* is way more popular than halloumi - and kajmak is similar to feta and bryndza cheese. Luckily I had bought some fresh bryndza cheese as well as Georgian suluguni cheese at the market on a previous day, so I used a mixture of these two instead.

A verdict - lovely and tasty and such a genius way for using up those spindly-curly scapes. One of my 5 aunties and one of my 13 cousins came over for dinner that night and the dish got their approval as well. At least none of us will ever waste any garlic scapes again :)

* A huge thanks to my friend Mann for helping me with the Slovenian cheese terms.

(Hautatud küüslauguvõrsed)
Serves 4

Sautéed Garlic Scapes

2 Tbsp extra virgin olive oil
2 Tbsp dark brown sugar
250 g garlic scapes
400 g fresh or canned chopped tomatoes
180 ml (about 3/4 cups) dry white wine
sea salt and freshly ground black pepper
1 Tbsp chopped fresh flat-leaf parsley
about 100 g of cheese (crumbled brynza or feta or cubed and fried halloumi)

Trim the garlic scapes by snipping off the thin tip on top of the garlic buds - this would simply burn on your pan. Discard. Cut the rest of the scapes into 5 cm/2 inch pieces.

Heat oil on a heavy frying pan over medium heat. Add sugar, then stir for a couple of minutes to melt and caramelise the sugar. Add the garlic scapes, cover and fry on a moderately high heat for about 3 minutes, shaking the pan every now and then.

Uncover, then add the tomatoes and wine. Cover the pan again, reduce heat and simmer on a low heat for 8-10 minutes, until the garlic scapes have al dente or softened, depending on your preference.

Season to taste, fold in the parsley and scatter with cheese. Serve hot or at room temperature.

Friday, May 28, 2010

Old posts, new photos

Most of the dishes that make it to Nami-Nami are true favourites, not just one-off cooking experiments. The recipes I share are ones that I make regularly at home (like the rhubarb muffins below - I've made them FOUR times this month alone!). Nami-Nami will be five years in a few weeks, and during that time my picture-taking skills have improved (well, at least I'd like to think so!). While remaking old favourites, I've also been taking new photos. I've recently replaced the photos in many old posts, and here are links to just four of them. Enjoy!

Roasted peppers with cumin-scented halloumi cubes
Peppers with halloumi / Halloumi-täidisega paprikad

Chickpea (Garbanzo) and Tuna Salad
Chickpea & tuna salad / Kikerherne-tuunikalasalat

Small tuna omelettes
Tuna omelets /Tuunikalaomletikesed

The best rhubarb muffins ever
The best rhubarb muffins ever / Maailma parimad rabarberimuffinid

Thursday, November 30, 2006

Georgian cheese bread: Hatchapuri/Khachapuri

Hatchapuri / Hatšapuri
Photo from April 2008

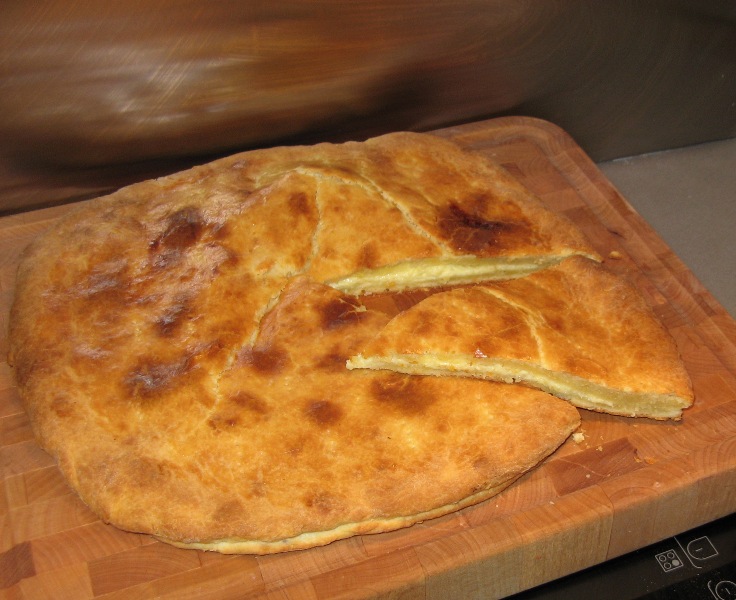
I - finally - made some hatchapuri. Hatchapuri, for those of you who don't know it, is a famous Georgian cheesebread. Somehow - not sure where I got the guts to do that! - I ended up wholeheartedly defending Georgian cuisine in general and hatchapuri recipe in particular over at Kuidaore during my very early blogging days. Il Forno's Alberto wrote about hatchapuri (or khachapuri, as he spells it) already in early 2004. More recently, my fellow Edinburgh blogger (until I moved back home, that is) Melissa so eloquently wrote about it on The Traveler's Lunchbox. There's a recipe in the latest Nigella book, as well as Darra Goldstein's almost scholarly book The Georgian Feast. This very cheesebread is positively 'in' at the moment. However, as both of these books of mine are still in sort of transit from Edinburgh to Tallinn and I won't get my hands on them until Christmas, then I had to look elsewhere for a suitable recipe. The simple recipe below is adapted from an Estonian food enthusiast who writes under the name of Volks Vaagen, who has got it from a Georgian lady called Natalya.

Now, before we proceed, remember that just like there are loads of different pizzas, there is a huge range of hatchapuri breads out there. The type and name of your cheesebread depends on where in Georgia you're trying to bake and/or eat it. There's Imeruli hatchapuri (flat, round bread, using imeruli cheese), Acharuli/Adjaruli hatchapuri (a suluguni cheese bread 'boat' topped with raw egg and then cooked; sometimes also referred to as Georgian pizza), Achma hatchapuri (a very rich and layered cheesebread) , Megruli hatchapuri (has cheese both inside and outside the bread), Svanuri hatchapuri (also known as chvishtar), Rachuli hatchapuri, Phenovani/Penovani hatchapuri (with a flaky pastry, formed as a triangle), Ossuri hatchapuri (filled with cheese and mashed potatoes), Guruli hatchapuri (thick and crunchy, with lots of cheese, formed as a log).
I'm pretty sure the list is not exhaustive (I'll report back when I compile a definitive list of various hatchapuris:)

You should really use imeruli/emeruli cheese or suluguni cheese for this recipe, although 
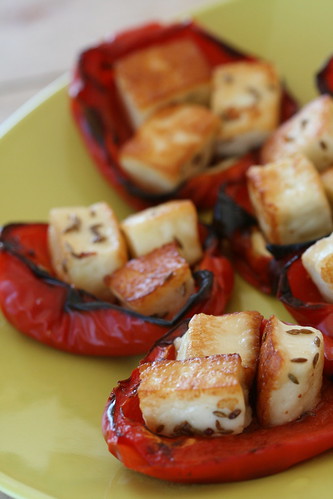
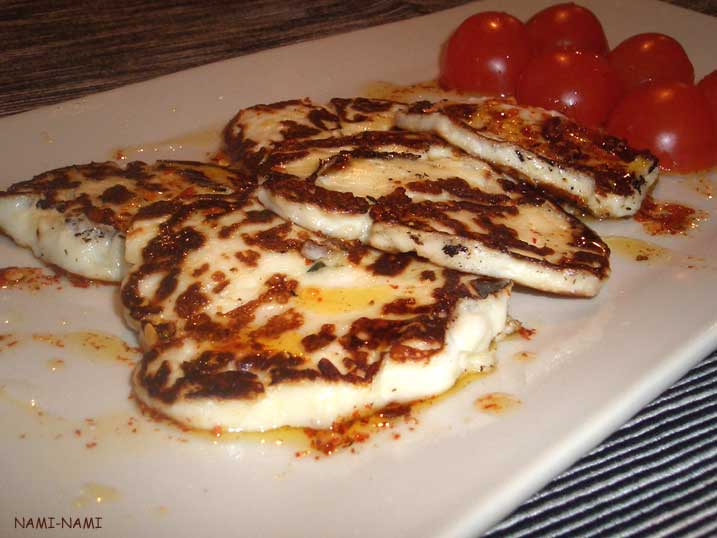
brynza cheese would work, too, as it is similarly salty. I used suluguni here. Suluguni is a whole milk cheese from Georgia (as in the Caucasus, and not in the US, obviously) , which can be grilled (I'm thinking of using suluguni instead of halloumi in the recipe for roasted red peppers with cumin-scented halloumi). Luckily, there's a considerable Abkhasian Georgian community in Estonia, and they've set up a small suluguni cheese factory in Kehra near Tallinn. It's not readily available in supermarkets, but you can easily buy that at local markets here. If you live in the US or UK, then try the Russian stores. Or see what alternatives Melissa and Alberto recommend.

I'm pretty sure it would be a fantastic accompaniment to Chakhohbili, the Georgian chicken stew with loads of herbs and wine. There's garlic in the cheese filling of this hatchapuri, which gave a real extra kick to the flavour. Feel free to leave it out, if you prefer a milder taste sensation.

Georgian cheese bread Hatchapuri
(Hatšapuri)
Yields 6 generous wedges.


For the dough:
250 grams sour cream
150 grams butter or margarine, melted
1 egg, slightly whisked
350 g plain flour (or a bit more, if necessary) (about 600 ml)
a pinch of salt
0.25 tsp baking soda
1 tsp sugar

For the cheese filling:
200 grams suluguni cheese, coarsely grated
1 egg, whisked
2 Tbsp sour cream
2 cloves of garlic, finely chopped (optional)

Mix sour cream and melted butter. Add salt, baking soda and sugar, whisk in the egg and add flour in installments. Knead slightly, until you've got a soft & pliable dough. Divide into two, roll each into a large circle (25 cm or so).
Grate the cheese, mix with egg, sour cream and chopped garlic.
Place one dough circle on a baking sheet covered with parchment paper. Spread the cheese filling on top, leaving about 1 cm from the edges clean. Cover with the other dough circle, press the edges firmly together.
Brush with egg or sour cream, pierce with a fork here and there. Bake at 200C for 20-30 minutes, until hatchapuri is lovely golden brown colour.

Friday, April 11, 2008

Nigella Lawson's No-Churn Pomegranate Ice Cream


I looooooove Nigella. Apart from my pistachio macarons disaster, all the recipes I've tried from her books have worked like a charm. Be it Pasta alla Vodka, Store-cupboard Chocolate and Orange Cake, Cranberry Upside-down Cake, Upside-down Red Onion Supper Pie, Chocolate-Cherry Cupcakes, Pan-fried Halloumi with Chilli Drizzle, Raw Beetroot Salad with Dill and Mustard Seeds, her Rum-Soaked Banana Bread, her cheeky Cheesy Feet, Rosemary Loaf Cake, or her Lemon and Parmesan Linguini - you name it, I love it. Her effortless and luscious style of cooking, and easy, yet decadent choice of recipes appeals as well. So when my friend Ruxandra recently offered to send me her extra copy of Nigella Express, of course I said yes.

Within a fortnight I had tried quite a number of recipes from the book. I've already shared her Cider and Mustard Pork Chops with you; I've also tried and enjoyed her recipes for Hokey Pokey, and Grilled Duck Breasts with Pomegranate Seeds. And then there was this beautiful, beautiful no-churn ice cream recipe. The fact that it's no-churn is neither here or there for me - I've got a Kitchen Aid ice cream attachment, so I'm ok with traditional churning ice creams. However, I'm also very keen on pomegranates and have been able to source some extremely sweet and juicy and delectable pomegranates at my local supermarket recently, so I was keen to try this. And Nigella - it was absolutely delicious again!

I've changed the quantitites to fit local conditions (cream is sold in 200 ml tubs here, as opposed to 240 ml tubs in the UK, so I've downsized that bit); also I used 35% whipping cream instead of 48% double cream suggested in the original recipe. And because my pomegranates were so sweet, I reduced the amount of sugar - you may want to stick with the original

Nigella Lawson's No-Churn Pomegranate Ice Cream
(Nigella granaatõunajäätis)
Serves 6-8


2 pomegranates
1 lime
150 g icing sugar/powdered sugar
400 ml whipping cream

Halve the pomegranates (reserve some pomegranate seeds for garnish) and the lime, juice them and strain the juices into a bowl. You'll need just under 200 ml of pomegranate juice*.
Add the icing sugar and whisk to dissolve.
Whisk in the whipping cream, and keep whisking until soft peaks form.
Spoon and smooth the ice cream into a rigid plastic container with a tight-fitting lid. Place into a freezer for at least four hours or overnight.
To serve, let the ice cream soften for 5-10 minutes, then scoop into nice bowls (I used my Iittala glass bowls), scatter with pomegranate seeds and enjoy.

* You can use a good-quality pomegranate juice instead, but I doubt it'll be as tart-sweet as freshly squeezed juice.

Tuesday, October 28, 2008

Recipe for Mozzarella Stuffed Peppers


Stuffed peppers are a handy supper dish, but many of the 'traditional' versions (i.e. filled with minced meat and rice) are too heavy for me. Recently I've tried couple of lighter versions, and this one was well received at a recent dinner with friends. The recipe is adapted from an old issue of British Tesco Recipe Magazine (March 2003, I believe). The dish contains very few ingredients, but had surprisingly plenty of flavour, so I'll definitely try this again.

PS Sorry for the small hiatus - I was participating at a workshop in Finland, spending most of the last week in Tampere and Helsinki. It wasn't all work, however, as my dear K. joined me for the weekend of special shopping and delicious eating in Helsinki.

Mozzarella-stuffed Peppers
(Mozzarellaga täidetud paprikad)
Serves 3 as a main course or 6 as a starter


3 bell peppers (a red, yellow and orange one, perhaps?)
1 Tbsp olive oil
150 g fresh mozzarella cheese, cubed
8-12 cherry tomatoes, halved or quartered
half of a red onion, thinly sliced
a generous handful of fresh basil leaves
salt
freshly ground black pepper

Halve the peppers, remove the seeds. Brush the pepper halves with oil, both inside and out, and place snugly next to each other in an oven dish.
Divide mozzarella cubes, halved or quartered cherry tomatoes, onion slices and half of the basil leaves between the pepper halves.
Season with salt and pepper and drizzle with olive oil.
Bake in the middle of a 180 C/350 F for 30-40 minutes, until mozzarella has melted.
Sprinkle the rest of basil leaves on top, drizzle with some more olive oil and serve with a crusty bread.

Other stuffed peppers recipes @ Nami-Nami:
Red peppers with cumin-scented halloumi cubes
Pointed red peppers stuffed with spinach & mushrooms

Saturday, July 14, 2007

A Beetroot & Potato Pie


UPDATE 22.8.2007
One of my Estonian readers tried this pie and really liked it. You can see her photo here.

*****

I posted the above teaser picture yesterday and asked you to guess what it was. Well, I'm sorry to tell that none of the seven readers who left their guess in the comments got it right. It's not a cherry pie, nor raspberry pie and it's definitely not a rhubarb pie (we don't really eat rhubarb after St John's night over here). And there's no meringue involved either.

It wasn't even a sweet pie, but a savoury one. But even if I had told you that, I doubt that you had guessed the ingredients - it's a beetroot & potato pie :)

And what a brilliant pie it was. Apart from being tasty (though you do need to like beetroot to like a beetroot pie, of course), it also looked beautiful, and my whole extended family wholeheartedly approved. The recipe is very slightly adapted from the Finnish Herkkutori site and the recipe below will yield 6 generous slices. If you don't feel like making a pie, yet want something with lovely beets and new potatoes, then check out Alanna's recipe for Scalloped Potatoes with Beetroots.

Beetroot & Potato Pie
(Uhke peedipirukas)


For the pastry*:
50 grams soft butter, at room temperature
250 grams plain flour
2 tsp baking powder
100 ml milk

Filling:
4 small beets
4 medium potatoes
3 eggs
150 ml sour cream or creme fraiche
150 ml milk
1.5 tsp salt
1 tsp black pepper

For brushing:
a small egg

First, prepare the pastry. Mix flour with baking powder and knead it into the soft butter, adding milk bit by bit (you may need a spoonful more or less, so don't rush). Press the pastry into a ball, wrap in plastic and put into the fridge for 30 minutes.

For the filling, boil beets and potatoes (separately) until almost done (for small beets, this would probably mean about 20-25 minutes). Drain and cool and peel. (You can obviously also use left-over boiled beets and potatoes). Cut into thin slices (about 3-4 mm thick).

Mix eggs, sour cream and milk in a bowl, season with salt and pepper. Put aside.

Divide the pastry into two pieces (about 1/3 and 2/3). Roll the larger piece of pastry into a thin disc to cover the bottom and sides of a 25 cm high springform non-stick pie dish. Press firmly onto the sides.

Now layer the potatoes and beets into the pastry shell, pour over the egg and cream mixture.

Roll the smaller pastry piece into a disc large enough to cover the pie, place over the filling and press edges firmly together.

Brush with an egg, pierce couple of holes into the lid and place into the lower shelf of a pre-heated 190-200 C oven. Bake for 35-40 minutes, until the pie is lovely golden brown.

Let it cool a little, then remove the springform dish.


Serve with a herby yogurt or sour cream sauce. The pie is excellent when still warm, but can also be taken along to a picnic on the following day, as it doesn't loose any of the flavour when cold (and if you compare the second and third photo, then you can see that the beetroot 'leaks' into the potato layers overnight).

* I reckon you could also use the pastry I used for making hortapita or the Greek pie with wild greens to make this beetroot & potato pie.

BLAST FROM THE PAST
Two years ago I posted a recipe for Paul Hollywood's mint and halloumi bread. Although I think Mr Hollywood got some of the quantities wrong (20 grams of dried mint is A LOT!!!), the bread itself is fabulous and definitely worth trying.

Sunday, May 27, 2007

Waiter, there's something (stuffed) in my ... tomatoes with two types of filling

Waiter, there is something in my ... - a wonderful food blogging event organised by Johanna, Jeanne & Andrew - has reached it's fifth instalment: stuffed fruit/vegetables, hosted by Jeanne.

My entry for this round is stuffed tomatoes with two kinds of salad fillings. It's not really a recipe, just a tip for serving nice small tomatoes. The first filling is a cod liver salad that I have written about before. The 'recipe' is my mum's, and this is how cod liver has been eaten in our family for decades. I thought that was the only way of serving this particular fishy preserve, until K simply put a canned cod liver on the table. Apparently his family simply spread the liver on a slice of bread, straight out of the can. I prefer my way, and as far as I've understood, have converted him, too :)

The other recipe for wild garlic & cucumber salad is from my local bus stop. Yes, you read it correctly - bus stop. I knew that wild garlic (Allium ursinum) grows somewhere in our neighbourhood, but I had never seen it wild, nor had I ever picked it. One late morning in early April I was standing in a bus stop, waiting for the bus to take me to town, and next to me were two elderly Russian-speaking women, or babushkas:) My Russian is very rusty, so I didn't understand much of what was said, but my sense of smell seems to work just fine, as I suddenly realised that something was smelling very fragrantly and faintly garlicky. I turned to the women and asked them about the smell, and they kindly showed me their bounty. Eventhough I had never seen 'uncooked' Allium ursinum in my life, I recognised the green leaves immediately from photos - it was wild garlic! I was given a large bunch to go with, and two recipes to boot. One of the women claimed that the best way to eat it is with some cucumber, sour cream, and salt & pepper. The other swore by wild garlic, boiled egg, sunflower oil, salt & pepper. As they both seemed to be very knowledgeable about wild garlic, I took their advice seriously and have been religiously following it. I can tell you that after I found the secret hidaway near my house, I've been eating a lot of the first salad since. I'm yet to try the other..

Stuffed tomatoes with two types of salad


about 20 small ripe, but firm tomatoes

Cod liver salad
(Tursamaksasalat)

1 can of cod liver chunks, drained (reserve the oil)
1 small shallot, chopped
1 pickled cucumber, finely chopped
1 boiled egg, chopped
salt
black pepper

Mix all the ingredients, add some of the reserved oil to make it moister, if you want.

Wild garlic & cucumber salad
(Karulaugu-kurgisalat)

a bunch of wild garlic, washed and roughly chopped
a small cucumber, washed, quartered or halved lenghtwise, and sliced
sour cream

Mix the cucumber, wild garlic and enough sour cream to bind everything together. Season with salt, if necessary (I haven't done it, as the salad has plenty of freshness and taste without any).

Now comes the tricky part. Halve the small tomatoes, scoop out the flesh and drain the juices. Stuff tomato halves with above-mentioned salads. Voila!

Other stuffed fruit & vegetables @ Nami-nami:
Baked red onions stuffed with mushrooms, feta cheese & pine nuts (March 2006)
Oven roasted pears with caramelised oats filling (November 2005)
Red peppers stuffed with spinach & mushrooms (April 2006)
Red peppers with cumin-scented halloumi cubes (November 2006)

Here are links to my previous Waiter there is something in my ... entries:
April 2007 (BREAD): a traditional Estonian quick mushroom bread, Seenekarask
March 2007 (EASTER BASKET): a selection of various Easter delights.
February 2007 (PIE): a great Russian puff pastry and fish pie, Salmon Kulebyaka.
January 2007 (STEW): my version (in collaboration with Anthony Bourdain:) of the French classic Boeuf Bourguignon.

UPDATE 1. June 2007: Read Jeanne's roundup here

Saturday, April 22, 2006

Mail order tsoureki: kaló páscha

I celebrated Easter last weekend with paskha, the typical festive dessert back home in Estonia. This weekend I helped a Greek friend in need to celebrate Orthodox Easter. On this occasion the Greeks eat a special sweet bread - tsoureki. I baked a rather nice one in Edinburgh last year, devoured in minutes by a bunch of Greek students, and consequently got a mail order request to make one again for this Easter. The large and beautifully aromatic tsoureki was flown to an undisclosed destination in mainland Europe. Thank you, C.D,. for acting as a courier on such a short notice!

The recipe is based on two Paul Hollywood's recipes - one from his book 100 Great Breads and another from UKTV Food. I keep having problems with Hollywood's recipes and I'm not sure they have been double-checked properly by the pastry chef himself. His recipe for mint & halloumi bread seemed also a bit awkward, though the bread I ended up baking was delicious. His two tsoureki recipes are even more confusing. The only constant seems to be the amount of flour (500 grams) - the amount and list of other ingredients vary rather wildly. Hollywood cannot really decide whether he wants 2 eggs in his tsoureki or none, whether to use 30 grams of dried yeast (!!!) or 15 grams of fresh (it should be other way around, surely!?). And adding 15 grams of salt to 500 grams of flour seems also a wee bit too generous. I want my guests to come back for more, so I've tweaked the recipes accordingly.

For example, I've omitted the raisins altogether, as according to my Greek sources there should be none in a tsoureki (raisins may be a Cypriot twist). I've reduced the amount of salt and butter. I didn't use the red eggs that are traditionally used to decorate tsoureki - although this is strictly necessary only if you eat the tsoureki on the Easter Sunday. This time I also managed to get hold of mastic and mechlebe - two new spices in my kitchen. Although I don't know how to describe them, they did give a very pleasant and unusual flavour to the end product. You should be able to find them from health food shops or shops specialising in Greek and Middle Eastern produce.

But definitely one beautiful sweet bread.

Greek Easter bread TSOUREKI
(Kreeka lihavõttesai "tsoureki")
Makes one large plaited loaf


500 grams strong white flour
75 grams golden caster sugar
50 grams softened butter
1 large orange, zested
0.5 tsp salt
a pinch of mechlebe (sour cherry pits - about 10), pounded finely
a pinch of gum mastic (ca 2 pieces), pounded finely
a generous pinch of ground cinnamon
1 egg
25 grams fresh yeast
150 ml lukewarm water
150 ml lukewarm milk

For brushing:
1 egg, beaten

Mix the flour, sugar, salt, orange zest, cinnamon, gum mastic and mechlepi and soft butter in a large bowl. Crumble the butter into the dry ingredients.
Mix the fresh yeast with a small amount of lukewarm water until combined, add to the dough.
Add the egg, lukewarm milk and water and mix everything together with your hands.
Dip the dough onto a floured surface and knead for 5 minutes, until the dough doesn't stick to your hands anymore (you may have to add some more flour).
Put the kneaded dough back into the bowl, sprinkle with some flour and cover with a clean kitchen towel.
Leave to rise for one hour in a warm place, until the dough has doubled in size.
[Or, if you insist, leave to rise at room temperature, go for a cocktail with friends at Dragonfly @ Grassmarket and then for a meal at Hanam's, a new Kurdish & Middle Eastern restaurant @ Tollcross. Return 4 hours later and continue].
Knock the dough down and dip onto a slightly floured surface again and divide into three. Roll each dough piece into a long strip and plait the strips together. Lift onto a large baking sheet and leave to rise for an hour, until doubled in size again.
Brush with beaten egg and bake in the middle of 200˚C oven for 25-30 minutes, until tsoureki is nice and golden brown.

Monday, September 12, 2005

Suggestions, suggestions

Like many other foodbloggers, I have a list of favourites on the right hand side of the screen: other foodblogs I visit, favourite places to shop, books I like, books I want etc. Mainly it's a way to provide shortcuts for myself - I find it's easier to click from my site than to go to the favourites' bar in my browser and look up bookmarked websites. It's also a sneaky way to suggest what to get me if someone is struggling with birthday/Christmas/random gift ideas:)

My Greek beau moved to Amsterdam to start his PhD at the end of August, and came over for a visit last weekend. Few days earlier I had received a parcel from Amazon. I was a bit confused, as I hadn't ordered anything from them recently. At least I couldn't remember ordering anything from them lately. When I opened the parcel, I realised immediately what was going on, and it brought a big smile to my face. The parcel contained a book I've wanted for a while, The Real Greek at Home. My Greek beau claimed that he only ordered it because it was at the top of my Books I Want list, although I suspect he had some alterior motives. I think he was suggesting what I should/could cook this weekend. Just in case I was struggling with the idea:)

I must admit that although my usual food repertoire includes some Greek dishes (my feta-spinach pie has been one of the favourites for almost a decade now and I'm quite a fan of tzatziki), my love affair with a Greek food is new. I went to Greece for the first time in July 2002, to attend an IVSA conference on Santorini (see the pic on the right). And to be honest, I didn't eat much. It was 40 degrees Celsius, it was hottest and sunniest place I'd ever been to and, to be frank, I was struggling to stay alive (interestingly, dipping in and out of a 100˚C sauna doesn't seem to drain me as much. Maybe it's the sun?) In any case, food was the last thing in my mind, and I was on a diet of frappes and gallons of water for two weeks, having some light nibbles in the evenings when it was cooler. And even then I was on a self-imposed diet - as most of my friends were keen to try various seafood dishes in various seaside establishments - deep-fried squid, grilled octopus etc - I was inevitably left with another plate of horiatiki. I don't eat shellfish & molluscs, you see.

I spent another few days with a Greek friend on Sifnos after the conference, where I had a pleasure of trying his Granny's fabulous meatballs and a traditional Sifnos chick-pea dish - tsoukali revithia alias 'revithia se sifniwtiko tsoukali'. My friend Stam (who was also a student in Edinburgh, but always returned home for summer) mixed chickpeas, oil and seasonings in a special clay pot - tsoukali revidion, which he then took to a communal oven in the evening (see pic, it's hard to see but all clay pots have family names written on them), where it slowly cooked over night. Apparently it's done every Saturday night, and the chickpeas are then picked up on Sunday morning and eaten during the day. I also brought along some really tasty almond and nut biscuits from the local bakery which I still miss occasionally.

But overall the culinary side of Greece remained somewhat unexplored back then. I did buy a Greek cookbook on the way back in the airport, but that turned out to be utter crap - for instance, it has a taramasalata recipe that forgets to mention fish roe etc, it's full of typos and it annoys me more than educates me.

I was again in Athens in October 2003, this time attending a really beautiful and romantic wedding of my friends Anna & David. As it was much cooler - the temperature was a very agreeable 20˚C or so - my appetite was much bigger. And I got to try some really lovely Greek dishes at the banquet and dinner.

Since early this year I've been flirting much more regularly with all the delicacies Greece has on offer. I've read a lot about Greek food, and tried out several dishes. Mostly with a great success. Only my Cypriot halloumi & mint bread got a lukewarm reception, but I think this had more to do with personal politics than my cooking skills, as the bread was finished quickly by non-Greek eaters:) I made tsoureki and stifado for Easter, and have cooked spanakopita, moussaka, gigantes beans, paputsakia, Greek meatballs, roasted feta with olives and red peppers, on other occasions. To sum up - feta cheese and Total Greek Yogurt are some of my kitchen staples nowadays. And last weekend saw me preparing another Greek meal. For inspiration, I scanned both The Real Greek Food that suggestingly appeared in my mailbox, as well as the fabulous The Olive and the Caper that I had bought few months ago. Eventually, as I was running out of time and could not lovingly simmer a tomato sauce for an hour before baking it for yet another, I stuck with an old and tested favourite - hob-to-table moussaka. And I'll tell you all about it soon.